How to Mount a TV on Your Wall

TV Mounting

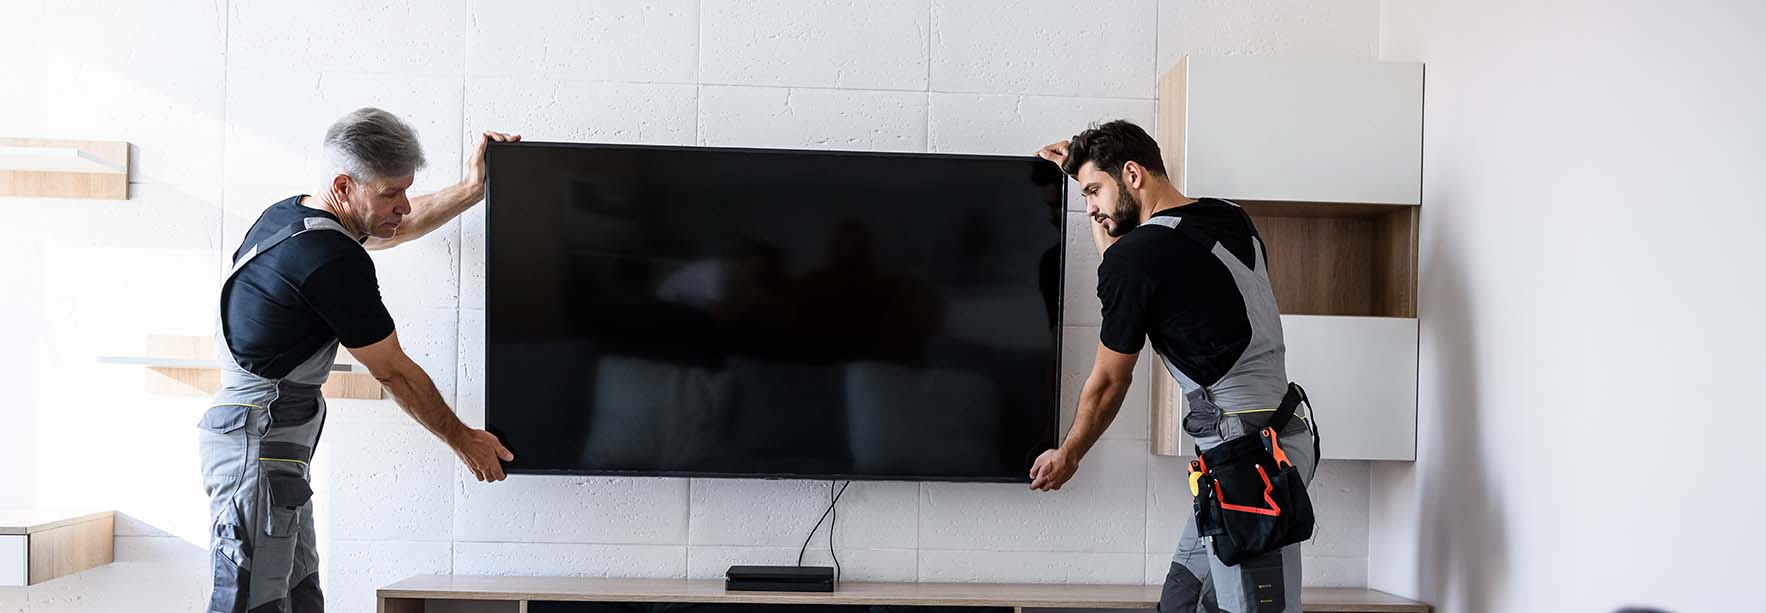
If you’re willing to put in some time and effort (and maybe enlist the help of a friend) then hanging a TV on your wall is actually pretty easy.TV Mounting

Start with a stud finder to locate the metal studs on your wall. A stud is the best place for a TV bracket to rest. Contact Nashville TV Mounting for professional help.

When mounting a TV it is important to take care of how wires will be managed. This will ensure the safety of the TV and also provide a neater appearance. There are several options to consider when it comes to wire management, including surface mount cord covers, cable raceways and in-wall cord runs. In most cases it is best to have at least one or two of these options available so that you can choose the option that works best in your space.

A stud finder is an excellent tool to have on hand when mounting your TV. This can be used to help locate wall studs and will allow you to drill in the correct place. A standard stud is 16 inches apart so be sure to locate the correct location before drilling. Also, it is a good idea to have a partner when installing the mount so that they can hold the television while you drill.

If you are mounting your TV in a brick wall, it is best to have masonry drill bits and a hammer on hand. These tools will help you drill through the brick and into the underlying drywall or concrete. You will also want to make sure you have a good quality power drill that is designed to work with masonry materials. A masonry drill will also have a special tip designed to bite into the brick and allow you to install the screw anchors that will hold the mount in place.

If you have a lot of wires that need to be run behind the wall, a cable management box is an excellent choice. These boxes can be placed on the floor or mounted to the wall and will allow you to route all of your cords inside of them. This can be a great solution if you do not have enough room for a cord cover or if you prefer the look of all of your cables being on the wall rather than in the middle of your room.

If you are looking for a more modern and sleek appearance, a fixed mount may be the best option for you. This will prevent the need for you to continually move the television to access your power outlets and will create a cleaner appearance in the living space.

Mounting Options

When it comes to TV mounting, the type of mount you need depends on a variety of factors. You’ll want to consider the size of your TV, the layout of your space, and your personal preferences. Once you know these basics, you can narrow down your options and find the perfect TV wall mount for your home.

Wall-mounted TVs are a great option for anyone looking to free up space and streamline their entertainment setup. With a little planning and the right TV mount, you can hang your flatscreen on a wall or on furniture like a media cabinet or table. The biggest benefit of a wall-mounted TV is that it eliminates the need for a stand. This saves floor space and makes your room feel more open.

The other main benefit of a wall mounted TV is safety. Unsecured TVs are a tripping hazard and can fall over, especially in homes with children or pets. Having your TV mounted on the wall can reduce these hazards, and it can also make it harder for kids or pets to reach the screen.

There are several different kinds of TV wall mounts, so you’ll need to decide what kind will work best for your space and needs. Some mounts are flat and mount the TV straight against the wall, while others have a swivel or tilt feature that lets you adjust the viewing angle of the screen. Some mounts can even fold down to the wall for easy storage when not in use.

Before choosing a TV mount, it’s important to confirm that your TV is compatible with the mount. The TV’s owner’s manual should clearly state if it is wall-mountable or not, and it will often have a set of holes on the back of the device (called a VESA pattern) that determine its compatibility with various mounts.

If your TV is not compatible with a VESA-compatible mount, you can try spanning two known studs in the wall with a sheet of plywood. Ensure that the thickness of the plywood is greater than the gap between the studs to prevent it from falling or warping.

TV Weight

For the safety and security of your TV, it is important to consider the weight capacity when selecting a mount. A quality mount is designed to securely attach your TV without putting strain on the frame. The weight limit for a mount is usually listed with the product description or on the packaging. A good rule of thumb is to choose a mount that can support the weight of your TV plus an additional 50 pounds. This extra weight will help prevent the mount from bending, slipping or falling off of the wall.

The first thing you need to do is determine the size of your TV and the VESA pattern. The VESA pattern is the arrangement of holes on the back of your TV that allow you to attach a mounting bracket to the wall. Almost all modern TVs have the VESA pattern, and you can easily identify it by looking at the back of your TV for a label that says “VESA” or for a chart that lists the sizes of each hole.

Depending on the size of your TV and the type of wall you are installing it on, there are many different TV mounts available. You should select a mount that is rated for the weight of your TV and has enough holes to accommodate the screws on your TV. You may need to purchase an extension kit if you are mounting a large TV on a drywall wall that has smaller holes than the mount requires.

Another consideration is if you want to use an articulating mount or a flat mount. An articulating mount allows you to tilt your TV into different positions, which can be useful for reducing glare or for positioning the screen away from the wall during storage. The downside is that it can also put more stress on the mount, which could reduce its lifespan.

It’s important to remember that a TV is not a decoration; it’s a tool for entertainment and communication. It’s important to hang it correctly to get the most out of your investment. Using the right mount can ensure that your TV is secure and safe, and it can add a stylish and functional touch to any room.

Safety

Mounting a TV is a great way to free up space in your home and create a modern look, but it’s important to keep safety in mind. Proper installation techniques and regular maintenance will help ensure that your TV wall mount remains safe for years to come.

Start by reading the manufacturer’s instructions that came with your TV mount. Then, line up the mounting plate on the back of your TV with the holes that are in the wall bracket template. Depending on the type of mount you have, these two halves may connect through a rail system, clips or screws. Be sure to tighten these attachments securely so that the mount stays in place.

Before drilling any holes in your walls, use a stud finder to locate the studs inside your wall. These structural supports will provide strength and support for your television and TV wall mount, so it’s essential that they are properly installed.

When installing the TV mount, be sure that you’re using a stud-rated anchor kit that matches your drywall. It’s also a good idea to secure the bracket to the studs with at least four screws, as this will help prevent the bracket from shifting or pulling away from the wall.

Once the wall bracket is firmly attached to the studs, use a power drill or screwdriver to drive in the remaining mounting screws. Then, test to see if the mount is stable by gently shaking it. If it moves, or if you hear any rattling, tighten the screws or adjust the mount’s position.

Another important safety consideration when mounting your TV is to make sure that the cable connections are properly secured and out of reach of children and pets. Dangling cables can become a tripping hazard, so use cable clips or ties to hold them in place and reduce the risk of accidental injury. If you have young kids, be especially careful to childproof your TV installation by securing any cables that are within reach of them. This will help ensure that they are not able to pull or damage the TV, as well as any other electronics in your home.

Importance of Carpet Cleaning

carpet cleaning

Keeping your carpet clean helps improve airflow. Dirty carpets can trap dust, dander, hair and bacteria.

Carpet Cleaning Lehi uses specialized cleaning solutions to remove these contaminants. They also ensure that your carpeting is thoroughly dried. Thorough drying prevents mold and mildew growth and musty odors. It also prevents wicking, where dirt and stains are drawn up from the bottom of the fibers as the carpet dries.

carpet cleaning

Carpet cleaning improves airflow in your home by removing the build-up of dirt, dust and debris that clogs up the room. It also helps in balancing humidity levels. Dirty and clogged carpets are difficult to breathe in, especially for individuals with respiratory issues. It is therefore important to get them cleaned regularly.

If you have children in your house, they often play on the floor and may trample on the dirty carpets. The carpet may also become a breeding ground for microorganisms like fungi and molds, which can cause allergies and infections. In addition, dirt and bacteria in the carpet can spread throughout your household if it gets airborne, making breathing difficult for people with sensitive respiratory conditions. This can also lead to a range of other health problems.

Professional carpet cleaners are able to eliminate the presence of these harmful organisms from the fibers of your carpet. Using hot water extraction, they can reach down into the fibers to remove any bacteria and viruses that might be hiding within. This will not only prevent the growth of mold and mildew but it will also help you avoid the risk of respiratory problems and allergic reactions.

Another benefit of having your carpets cleaned by a professional is that it can also get rid of tough stains, such as those caused by coffee spills, ink, red wine, oil and other liquids. They can also eliminate the unpleasant odors caused by these stains. The use of hot water extraction also ensures that the stain is completely removed from the carpet and it doesn’t reappear later on.

Dirty and unclean carpets not only look drab, but they can be home to allergens and other particles that are released into the air when they come into contact with people or surfaces in your establishment. These particles can trigger breathing difficulties for people with underlying health conditions such as asthma. Having your carpets regularly cleaned will eliminate these particles and make it easier for everyone in your establishment to breathe, including those with underlying health conditions.

Carpets add a touch of class and elegance to any home. However, it is easy for them to get dirty and stained from everyday use. Carpets must be cleaned regularly to prevent dirt and grime from damaging the fibers. Keeping them clean is important because it can prolong the life of the fabric and also make your home look beautiful. It is also a good idea to have your carpets cleaned by a professional to get the best results.

Besides adding beauty, carpets can help keep your house warm. They are usually made of thick fibers that provide thermal resistance. They can also protect your feet from cold floors. However, they can become dirty and worn out over time due to daily wear and tear, dust, and pet hair. Having your carpets professionally cleaned on a regular basis can help them last longer and maintain their color and texture.

Aside from enhancing the aesthetic of your home, cleaning your carpets can also improve the health of your family. There are many pollutants trapped in your carpet that can cause respiratory problems if they are not removed. Some of these include pet odors, food spills, and stains. Professional carpet cleaners will remove these pollutants and leave your home with fresher air.

If you are thinking of selling your home in the future, it is a good idea to have your carpets professionally cleaned. This will make your home look clean and will help attract potential buyers. It is also a good idea to hire a professional that is CRI certified to ensure that they will use the proper equipment and products.

Having your carpets cleaned by a professional is also cost-effective compared to replacing them altogether. Moreover, it is a lot easier to get your carpets cleaned by a professional than doing it on your own. Professionals will move furniture and other items to allow them to clean the entire area of your carpet. This will save you a lot of time and effort that you would have otherwise spent cleaning your carpets.

Carpet cleaning makes it possible to get rid of tough stains without spoiling the fabric. This is because the professionals know the right detergents to use to maintain the toughness of different fabrics. They also have the right machines to use for carpet cleaning. These machines include the ones that use hot water and powerful cleaning agents to dissolve and extract stains and other substances from the fabric.

Getting rid of odors in the fabric is also possible with this method. This is because it uses hot water to rinse away all the substances that cause odors in the fabric. The odors are then eliminated by the powerful chemicals in the cleaning solution. The process also removes allergens and bacteria from the fabric, which helps in making the environment healthier and safer for people to live in.

Regular cleaning also improves the appearance of the carpet, and keeps it from becoming worn down or distorted in shape. This is especially important for carpets that are located in areas that are prone to a lot of foot traffic.

Carpets that are very dense or have a high pile tend to hold and trap more dirt particles and other elements. These can then be released when the carpet is walked on, and they can cause allergy reactions in sensitive individuals. Carpet cleaning regularly can prevent the buildup of these elements, and it is important to choose a company that uses non-toxic and biodegradable cleaning solutions.

It can also be useful to have the carpets cleaned more frequently if there is a family member that has asthma or other breathing problems. Regular carpet cleaning can kill dust mites, which are microscopic insects that can trigger allergic reactions in some individuals.

The hot water extraction method used by professional cleaners is highly effective at removing contaminants from deep within the carpet fibers. This can help the carpet last longer, which can save the owner money on future replacements. It can also help improve indoor air quality by reducing pollutants and allergens like dust mites, pet dander, and pollen.

Stains can ruin carpet and can be hard to remove without damaging the fibers. Fortunately, many of them can be removed using home remedies and professional carpet cleaning services. The most important thing is to treat the stain as soon as possible. The longer a stain sits, the harder it will be to get out. So, be ready with a cleaner or spot remover right when a stain occurs.

Bleach comes in handy when it’s time to clean towels or a toilet bowl, but it’s not so great for carpets. The best way to deal with bleach is to blot it as quickly as possible. Protect your hands by covering them with gloves and use a cloth that you don’t mind getting bleach on (like a white towel) to dab at the stain from the outside in. Blot until you have soaked up as much of the stain as possible. Then, soak up any remaining stain with clear water. Repeat as necessary to remove the entire stain.

Vinegar is a natural stain remover and can also be used on tough spots. The best way to deal with a wine stain is to blot it until you have soaked up as much of it as possible. Then, soak up any additional liquid with a towel. After the area is dry, sprinkle baking soda over it and vacuum it up. This will help to remove any lingering smells and freshen the carpet.

Other stain removing tactics include using a homemade synthetic cleaning solution on a small, hidden area of the carpet and rubbing it in gently with a white cloth or paper towel. Always pretest any cleaner on a piece of the carpet or in an out-of-the-way spot before using it on an actual stain. Always follow the product’s instructions. When using any synthetic carpet cleaner, make sure to blot and not rub.

If the above methods aren’t successful, it’s probably time to call a professional carpet cleaner like Our professionals can use their knowledge of fabric, stain types, and the specific cleaning process to effectively remove stains and maintain the integrity of your carpet.

How Common Roof Repair Problems Can Destroy Your Home Or Business

Roof Repair

A roof is a critical part of any structure. Without it, your home or business would quickly deteriorate from the elements. Damaged roofs can cause leaks, mold growth, animal infestation, and lower resale value.Roof Repair

Regular inspections are crucial to spotting roofing problems before they become significant problems.

A sound shingle roof needs a good layer of granules to offer UV, impact, and corrosion protection. But a number of common problems can rob your top of this vital layer.

Unsealed shingles are vulnerable to moisture and can allow water to seep into your home. Isolated cracks in shingles may be repaired with relative ease, but widespread shingle damage can signal the need for a full roof replacement.

Blistering is a more serious problem that causes dark stains on your roof. This symptom often points to inadequate ventilation in your attic or a deteriorating underlayment that’s allowing the heat of your home to melt the asphalt shingles.

Damaged shingles can also curl, creating an ugly, uneven appearance. Curling is often caused by a combination of factors, including high winds, improper installation, or poor ventilation. If left uncorrected, these problems can lead to leaks and other problems in your attic and throughout the house.

When shingles develop a concave center, or cup, the shingle becomes unstable and can eventually leak into your home. Cupped shingles also leave standing water that can cause mold and mildew, and the moisture can penetrate into your attic.

A common repair involves installing a new shingle over the old one. To do this, slide a flat pry bar under the damaged shingle and pry it loose. Carefully peel back the shingle layer above it, and use a catspaw pry bar to break the seal with the shingle underneath (this will require you to go two shingles up-roof). Pull out the damaged shingle and replace it with a new one. Use a caulking gun to inject roofing tar beneath the shingle for extra support.

If you’re replacing a badly torn shingle, it’s important to match the color of the replacement with your existing shingles. This can be tricky, but it’s often possible to camouflage the repair by examining the gutter for colored granules that have washed down from your roof. If you find a matching granule, you can sprinkle it over the new shingle to hide the repair.

Damaged Flashing

Flashing is a thin material that prevents water from seeping around chimneys, vents, skylights and other roof penetrations. It is commonly made from metals such as galvanized steel, copper or aluminum and helps to keep moisture away from these areas of the roof. Flashing is designed to be tough, but it can show signs of damage over time due to exposure to harsh weather conditions such as hail, acid rain and severe winds. In coastal neighborhoods, exposure to salt air can also degrade roof flashings.

Flashing problems range from small cracks and holes to rusted through or bent sections. It is important to watch for any discoloration on the wall or ceiling near where roof flashing is installed and also leaks during rainfall. Small holes may be easily repaired with roofing cement or roof caulk, but if left untreated, these tiny holes will turn into larger ones that allow rainwater to seep into the home.

In addition, a leaking roof can lead to corrosion of the flashing, which is a problem that requires a professional repair service. Faulty flashing can cause water to corrode through the shingles and into the attic, causing mold and mildew. It is also possible for a leak to run down the interior walls and into rooms that are not directly under the leaking flashing.

Even though it is not always possible to spot a problem with the flashing from the ground, it is important to have an annual visual inspection by a professional roofer to check for any damage or areas where moisture may be getting in. The expert roofer will be able to recommend a thorough repair for any areas of concern.

If the roof flashing is completely compromised, it will need to be replaced. It is important to have a professional replace the flashing immediately to ensure that moisture does not get into the attic and other parts of the home. The roofer will remove the affected shingles, expose the flashing and then install a new section of flashing that is properly sealed to the roof deck.

Damaged Pipes

Pipes that burst are one of the most destructive problems a homeowner can face. Leaking pipes cause water damage to walls, floors, ceilings, and furniture, and can also lead to mold and mildew that require expensive repairs. The longer a leaking pipe is left unattended, the more severe the problem will be. This is why it’s important to take action as soon as you notice a leaky pipe in your home or business.

There are a few ways to fix a damaged pipe, depending on where it is located. If the pipe is in a wall or ceiling, it may be possible to access it without opening any walls or removing any finish materials. In this case, you can use a pipe repair clamp or silicone or rubber seal tape to stop the leak. This is a temporary repair and should only be used until a plumber can arrive to evaluate the situation and make a more permanent repair.

If the pipe is outside, you can turn off the water using a local shutoff switch or the main water supply valve. Once the water is off, you can remove any waterlogged items and clean up the area around the pipe. Then, apply epoxy putty to the damaged pipe and joint. Make sure the area is completely dry before applying epoxy, and follow the manufacturer’s instructions for application and curing times.

Once the epoxy is cured, you can reconnect the pipe. If the pipe is exposed, you can use a coupling to connect it to the replacement pipe. If the pipe is behind a wall or ceiling, you will need to use a drywall saw to cut out the affected section of drywall and gain access to the pipe. After you have removed the drywall, use plumber’s flux to prepare the surface of the new coupling and the end of the replacement pipe. Then, solder the joints together.

A more permanent solution is to replace the damaged section of pipe with a new piece of PVC pipe. Before you start, you will need to shut off the water supply and make sure the old pipe is fully disconnected from all fittings. Then, use a gas torch to heat the copper pipe and the replacement coupling until they melt together. Next, feed solder into the joint and continue until it is filled with a smooth, watertight seal. Once the joints are sealed, you can reconnect the water supply and turn the water back on.

Damaged Soffit

Soffits are a crucial part of any sloped roof, acting as the skin that covers a roof’s eaves. They do a variety of tasks, such as protecting the inner roofing structure from moisture damage, helping with attic ventilation through small perforations, and supporting rain gutters that help keep water away from the fascia boards.

If you see soffit signs of damage, such as rot or a dark coloration, it is important to repair the damaged area promptly. Otherwise, you could experience serious structural problems that would require more costly repairs in the future.

Depending on the severity of the soffit damage, you may need to replace entire sections. This isn’t a project for a beginner, especially in older homes where builders used solid wood soffits. If you’re repairing a soffit in such a case, it’s best to hire a professional carpenter.

The soffit is located below the edge of the roof overhang, and it’s usually connected to the fascia with screws or nails. The soffit is a good place to start your roof repair because it is the first area of your roof that will show obvious signs of wear and tear, such as rot or discoloration.

You’ll also want to check the fascia board underneath the soffit for signs of wear and tear. A rotting or warped fascia can lead to further problems down the road, including leaks and water infiltration. Look for rot, dark discoloration or even cracks and chips on the fascia board.

The soffit is also home to different types of animals and pests, such as squirrels, rats, birds and more. Look for gnaw marks, droppings and nesting materials to find out if the soffit is infested by any of these creatures. They can wreak havoc in the attic and throughout the house if not dealt with promptly.

What Is Disaster Restoration?

Disaster Restoration

Restore Draper helps homeowners restore their homes after a natural or man-made disaster. Often, they can save money by cleaning, repairing, and restoring items rather than replacing them. They can also save valuable sentimental items, such as family heirlooms.Disaster Restoration

During mitigation, professionals block off areas with containment poles to keep contamination contained and safe. They protect surfaces with Trimaco’s heavy-duty surface protectors.

Remediation is the process of identifying and correcting an issue. In disaster restoration, remediation may involve cleaning up hazardous materials, repairing damaged buildings or roads, and restoring power and communications services. Remediation may also be used to describe the process of teaching students who are behind grade level in their academic subjects. Remediation classes help them catch up by providing extra support and instruction.

The disaster restoration industry is expected to grow at a significant rate in the next few years. This is due to the increasing number of natural disasters, such as floods, fires, wind storms, and heavy rain. The industry is characterized by the use of advanced tools and equipment and highly trained professionals. It is also characterized by the use of specialized training to prevent and mitigate the effects of a disaster.

Disasters can be devastating and cause massive damage to properties. The restoration of such damages is a difficult task and requires a lot of time, effort, and money. Disaster restoration professionals are skilled in assessing the damage and determining the best course of action to take. They use a wide range of methods and techniques to restore the property to its pre-disaster condition.

Whether you’re cleaning up after a flood, dealing with mold growth, or scrubbing up spilled chemicals, you need to protect yourself and your workers. Wearing personal protective equipment (PPE) is the most effective way to minimize risks, especially when working in confined spaces or tight areas. Protective gear includes gloves, eyewear, and a face mask. PPE can be purchased from many retailers, including hardware stores and home improvement centers.

Unlike mitigation, which reduces the impact of a disaster, remediation is a proactive measure taken to prevent damage from occurring in the first place. For example, if you live in an area prone to flooding, you might build levees or sea walls to prevent water from entering your house. Remediation can also include reducing the risk of erosion by removing sediment from rivers and streams. Remediation can be a cost-effective way to improve the environment and protect your property.

Cleaning

Cleaning can include the removal of dust, smears, and other contaminants from surfaces, as well as deodorizing and restoring items that have been damaged by smoke or fire. It often requires specialized products and equipment to clean contaminated surfaces and restore personal belongings. It also requires an eye for detail to bring intricate home details back to life.

Disaster restoration businesses can reduce the risk of injury by waiting to return to a job site until they are given clearance to do so. Local authorities, emergency responders, and stabilization organizations will inform them when it is safe to reenter the area.

Repairs

Repairs are the steps that go beyond cleaning and help restore a home or business to the condition it was in before a disaster occurred. This involves fixing damage, repairing water or fire damage, and replacing or restoring items like carpeting, furniture, cabinetry, draperies, appliances, and even sentimental items such as family heirlooms. Disaster restoration professionals also perform mold and mildew control as well as asbestos testing in order to prevent harmful contaminants from contaminating the property further.

Repairing after a natural disaster can be an overwhelming task. There may be multiple damaged buildings, washed-away roads and bridges, downed power lines, and hazardous materials scattered throughout the area. The first thing that needs to be done is secure the site. This includes examining the damage for safety and inventory purposes, which could include taking note of any fallen debris or equipment that may pose an immediate danger.

This step also involves ensuring that the proper procedures are followed in order to file an insurance claim. Disaster restoration service providers are familiar with the insurance industry and can work directly with your provider in order to ensure that all paperwork is completed properly. This allows for a quicker approval of your insurance claim and can save you the headache of figuring out how to cover the cost of the repairs on your own.

The COVID-19 outbreak had a significant impact on many industries around the world, but disaster restoration services have managed to weather the storm quite well. With the resumption of normal operations, businesses are starting to see an increase in demand for their services again. With the right training and the necessary tools, restoration service companies are continuing to provide high-quality work that helps rebuild communities. Some of the major players in this field are BMS Enterprises, Steamatic, Paul Davis Restoration, GDI Integrated Facility Services, Duraclean, Servpro, and Neighborly. These companies are offering the same level of service and care that they always have, regardless of the state of the economy or the outbreak of COVID-19. This is what makes them stand out from other competitors and will continue to drive their growth in the years to come.

Rebuilding

Disasters are often catalysts for change. The rebuilding and renewal process can be an opportunity to build more resilient and prepared communities for the future. It also presents the chance to rethink and improve upon the infrastructure that was previously in place.

Rebuilding is a complex and often grueling task that can take years to complete. In order to make the most of this opportunity, it is important to plan ahead and have a clear understanding of what is involved. This can help to ensure that the rebuild is up to code and meets the highest construction standards. It is also important to work with a professional contractor who can help navigate the sometimes complicated and overwhelming process of rebuilding.

A disaster restoration project is often a large undertaking and requires the assistance of many different agencies, stakeholders, and experts. This can cause delays and even setbacks, but a team that is dedicated to getting the job done will be able to overcome these challenges. To achieve this, it is crucial to have a clear and consistent communication channel. This can help identify any potential problems before they arise and keep everyone on track.

The rebuilding process after a natural disaster can be challenging, and it is essential to consider the long-term impact of any decisions that are made. This can help ensure that the rebuilding is not only cost-effective but also environmentally friendly and sustainable. In addition, it is important to involve the community in the rebuilding process. This can be achieved through community meetings, workshops, and participatory decision-making processes. This will help to build a sense of ownership and accountability and to develop solutions that are more likely to meet the community’s future needs.

Whether you are dealing with flood damage, hurricane damage, or any other type of natural disaster, it is vital to act quickly. By implementing these steps, you can restore your property and your life as soon as possible. By working with a professional, you can ensure that the rebuilding and repair process is completed in an efficient and effective manner.

The Basics of Masonry Construction

Masonry

Masonry Charleston SC is a type of construction technique that involves building structures by using individual units, typically laid in mortar. It is used to build everything from houses to bridges. To learn more about masonry construction, check out the following sections: Materials and Applications of Masonry Construction. Also, read on to learn about the characteristics of masonry construction.Masonry

Construction with masonry units is one way to construct buildings. These units are usually constructed using concrete and are stacked to achieve a wall thickness. They are also insulated, so they can resist moisture and are highly durable. Concrete masonry units are made of various types of concrete. A variety of masonry units can be used to create different looks.

Concrete masonry units have many different bond patterns, including stack bonds. This bond pattern is the most common type of bond. It involves the masonry units being laid with head joints less than a quarter of the unit’s length. The various bond patterns can also affect the strength of the masonry wall.

Concrete masonry units are also an excellent choice for infill projects. These projects are often located in clusters of vacant land or vacant buildings. Using this building material provides a cost-effective solution. An example is an eco-friendly residence, which has a low carbon footprint but functions like a high-performance building.

The mortar used for concrete masonry units is often made with Portland Cement, lime, or sand. A contractor should specify the correct mortar mix. This mixture must be consistent and contain the required amount of water to ensure a strong bond between the units. The mortar should be workable and hold up to the weight of concrete masonry units.

Concrete masonry systems have been used for a long time. Today, they are used for commercial, industrial, and residential buildings. They offer strong, durable exteriors that are also fire-resistant. They are also good at absorbing sound. And because they are easily available off the shelf, they reduce construction time.

There are many types of materials used in masonry construction. Concrete block masonry is one example. These blocks are made from concrete and are available in a variety of colors, shapes, and sizes. They are fast and easy to lay and are stronger than bricks. They are also more resistant to moisture and weather. They are also more durable than wood. This type of masonry also requires a larger manpower workforce and more steel, which is often used to reinforce cement concrete structures.

Masonry materials are tested and evaluated to meet specific requirements. Many of them must comply with ASTM standards for fire safety and durability. These specifications can help guide the construction industry in selecting the best materials for buildings. Bricks, mortar, and tiles are just a few examples of materials that can meet or exceed ASTM standards.

Historically, the choice of masonry materials has been influenced by the geological formations of a region. For example, the use of limestone and sandstone was common. These materials were used for the construction of temples, walls, and other structures. However, there were few outcrops of stone, so they used clay and sun-dried bricks.

Mortar is generally mixed on-site using a mechanical mixer to ensure uniformity. The materials are usually placed in the mixer in a similar way from batch to batch. The mixer adds half of the mixing water first, then the remaining sand after the mortar has stiffened. For best results, the mix should be mixed for three to five minutes according to the Specification for Masonry Structures.

Tight tolerances are an important consideration in masonry construction. When the tolerances are too tight, the appearance and structural integrity of the masonry can suffer. However, this should not be a problem as long as the masonry construction is constructed within specified tolerances. This will ensure that the final appearance of the project is satisfactory.

Bricks are among the most durable materials used in masonry construction. Bricks are individual units that are laid in courses, typically with mortar. There are different types of bricks available, depending on the style of construction. One type is called solid brickwork, which is made of two or more wythes of bricks. Bricks can also be made of stone, concrete, or manufactured stone. Some bricks can even be made of glass, tile, or stucco.