Why Residential Carpet Cleaning Is Important

carpet cleaning

Residential carpet cleaning helps to extend the life of your home’s soft surfaces. It removes the grime that accumulates with everyday wear and tear, spills, pet messes, and general dirt. It’s important to develop habits that stop dirt at the door, such as placing mats outside and inside entrances and encouraging everyone to take their shoes off. It’s also essential to schedule regular preventative residential carpet cleaning from https://www.joondalupcarpetcleaners.com.au/.

Improves Indoor Air Quality

carpet cleaningCarpets act like giant air filters, trapping various pollutants that enter indoor spaces from the outside. Some of these include dirt, dust, pet dander and hair, bacteria, and mold spores. Over time, these pollutants can build up and negatively affect indoor air quality. If you have family members with respiratory illnesses or allergies, this can pose a serious health risk for them. Residential carpet cleaning can help eliminate these pollutants and keep your family healthy.

If you don’t clean your carpets properly, they may start to deteriorate and create an unpleasant environment. Dirty carpets can also become a breeding ground for dust mites, which are notorious for causing respiratory problems. Residential carpet cleaning helps to prevent the spread of these insects by removing their food source, house dust.

When you clean your carpets, the vacuuming and cleaning methods used should be safe for your family and the environment. Many DIY cleaners use harmful chemicals that can leave a residue behind, contaminating the environment with dangerous volatile organic compounds (VOCs). The best residential carpet cleaning services employ green carpet cleaning methods that are free of VOCs and other toxic substances.

Professionals use special equipment to perform hot-water extraction, or steam cleaning. First, they pre-condition the carpet with a solution that loosens stains and debris. Then, they use a high-pressure hose to spray the carpet with extremely hot water, rinsing away dirt and other contaminants. They also use high-powered fans to speed up drying and reduce the chances of mold or mildew growth.

As carpet becomes more and more popular, people are becoming more aware of the impact that dirty carpets can have on their indoor air quality. In fact, studies show that when carpets are regularly cleaned, they can improve indoor air quality significantly. So don’t wait until your carpets look dirty to have them cleaned. Contact a reputable residential carpet cleaning service today to schedule an appointment. And don’t forget to open windows and use fans to maximize ventilation during and after your carpet cleaning to help it dry faster. This will also improve your indoor air quality and allow you to enjoy the benefits of a clean, fresh-smelling home.

Enhances the Appearance of Your Carpets

Carpets are an integral part of any home or commercial space, adding warmth and style. They also act as a filter, trapping dust, dirt, and other unwanted debris. However, they can only hold so much before they start to look dirty and dingy. This is why it is important to get your carpets professionally cleaned on a regular basis. Residential carpet cleaning not only removes the dirt and debris embedded in your carpet, but it also helps to restore its color and texture.

Dirty and dingy carpets can make an entire room look messy, even when the rest of the furniture and other features are clean and well-maintained. When you have clean, beautiful carpets, it gives visitors and guests a positive first impression of your home or business. In addition, regularly cleaning your carpets can help prolong their lifespan by removing the damaging soils that cause them to break down faster.

Professional residential carpet cleaners use high-quality, effective products to get your carpets looking like new. These products contain oxygen, which breaks up dirt and detaches it from the fibers of your carpet. They also contain encapsulators, which create microscopic sodium crystals around the broken up debris and prevent it from reattaching to your carpet. These crystals make the debris easier to remove during your carpet’s extraction process, and they also help to reduce the amount of water used in the cleaning process.

When you have clean, bright carpets, they will also be easier to maintain. Regular vacuuming and spot removal can keep your carpets looking and smelling great. You can also extend the life of your carpet by avoiding excessive foot traffic and using rugs or other floor coverings in high-traffic areas.

If you have just moved into a new home, getting the carpets professionally cleaned is an excellent way to give it a fresh start. Carpets are prone to trapping all sorts of bacteria and other nasty things, and a dirty carpet can release these harmful substances into the air when you walk over it. This can pose a serious health risk, especially for people with respiratory problems.

Makes Your Carpets Last Longer

Carpets make the home cozy and comfortable but they can also trap a variety of potentially harmful substances, such as allergens, pesticides, germs and dirt. These substances can trigger health problems and contribute to odors in the house. They can also cause stains and deteriorate the fibers of carpet. Having your carpets cleaned regularly prevents these problems and helps them last longer.

Residential carpet cleaning is the process of removing soils from carpets using hot water extraction. Professional cleaners use SOA-certified cleaning solutions that clean carpets without damaging them or causing them to resoil quickly. They can also provide carpet protection treatments that keep them looking better and feeling softer. If you want your carpets to last longer, have them professionally cleaned regularly, vacuum them often, put down mats and rugs at entranceways and encourage everyone in the household to take off their shoes inside the house.

One of the best things you can do to extend the life of your carpet is to vacuum it regularly, at least twice per week. This will remove loose dirt on the surface of your carpet before it can settle deep into the fibers and start to abrasive them. When you vacuum, go over each area several times and in different directions to ensure that all dirt is removed.

If you have pets, be sure to vacuum frequently as well, especially under furniture where pet hair can hide. In addition to regular vacuuming, use a specialized pet brush or a rotating vacuum attachment to clean the pet hair from the carpets.

The frequency of carpet cleaning depends on how much foot traffic your carpets get. Heavy traffic areas should be vacuumed more frequently than low-traffic areas. Carpets should be cleaned as soon as they begin to look dull and dingy, rather than waiting until they are completely filthy. If you wait to clean your carpets until they are dirty, it will be more difficult and expensive to get them clean.

If you take good care of your carpets, they can last for 15 years or more. However, excessive wear, matting, fraying or irreparable stains may necessitate replacement earlier.

Makes Your Carpets Look Like New

A home’s carpet is a major investment, and you want to keep it looking its best. Keeping up with regular cleaning is the best way to do that. A professional cleaner uses eco-friendly materials that will ensure your carpets look new for as long as possible. The cleaning process also eliminates any stains that may be on the carpet, preventing them from becoming permanent. The result is a clean and fresh looking carpet that will add to the overall appearance of your home.

Few elements of your home will last forever, but a well-maintained carpet can last for years. Vacuuming is one of the most important parts of carpet care, but even a thorough vacuuming will only remove about 75 percent of dirt and debris. A professional carpet cleaner will use a hot water extraction method that removes more dirt and debris. They will also use pretreatment to address spots and stains. These products break down the stain and lift it from the fibers, allowing the cleaner to penetrate deeper.

Once the carpet is clean, it should be allowed to dry completely. It is a good idea to keep children and pets off of the carpet until it is fully dry, as walking on it will flatten the fibers and increase drying time. If you are worried about the length of time it takes for your carpet to dry, you can always buy an air mover to help speed things up.

Regularly maintaining your carpets with weekly vacuuming and professional deep cleaning will prevent them from needing to be replaced too soon. This will help you save money in the long run and can prevent the stress of finding a replacement that matches your interior decor.

Having clean carpets can be a great thing for your family, but the reality is that it can take a lot of work to keep them that way. If you are tired of spending all day trying to clean your carpets and still not seeing the results you want, it’s time to call a residential carpet cleaning service. A professional carpet cleaner will use a process that will leave your carpets looking like new and smelling fresh and clean.


How to Mount a TV to a Wall

tv mounting

When properly installed, TV Mounting on a wall can be a great addition to any room. It can also be a safety hazard if not secured to the wall or studs.tv mounting

Use a stud finder to locate the studs on the wall where you want to mount your TV. Then mark the location of each stud.

Whether you’re upgrading to a bigger TV or simply want to free up space in your entertainment center, wall-mounting your television is a simple DIY project that can save you money and headaches. However, it’s important to understand the process before you begin in order to avoid mistakes that can leave your TV crooked on the wall or even hanging off the wall completely.

First, you’ll need to select the right mount for your set. This comes down to two main things: what size of TV the mount can accommodate and where you plan on mounting it. Most of the selections on our best TV mounts list will work with most modern sets, but you should check your specific set’s model and dimensions before you buy anything.

Once you’ve chosen a mount, you’ll need to make sure that the template provided with your mount will fit over the studs in your wall. The easiest way to do this is to tape up the mount template, then use a level to line it up horizontally and vertically (the location of the studs will dictate where you can place your TV, so make sure you know that before you start drilling holes).

If you don’t have a level, you can also try using a pencil to mark the locations where the studs should go on the wall. Then, drill the pilot holes, which are just big enough for your mounting screws to fit through. You’ll need a carbide-tipped masonry bit for this and a standard Phillips-head drill bit for driving the mounting screws.

Next, you’ll need to hold the mount up to the wall and use a level to make sure that it is level. If it’s not, you may need to use a screwdriver to loosen the screws in the mount template and move it until it is. Be sure to tighten the screws firmly once everything is in place. You’ll also need a carpenter’s level for final checks before you’re finished. This will keep you from ending up with a crooked TV that’ll leave you wondering where the problem is.

Choosing a Mount

There are a lot of different TV wall mounts available. Narrow down the options by determining your own viewing needs and the room in which you intend to mount the TV. To start, decide whether you want your TV to have a fixed or moving position. Once you have done this, you can narrow down the choices by evaluating features like the ability to swivel or tilt the TV and wire management options.

Then, be sure the mount is rated for the weight of your TV. All major brands will list the suggested weight limits for their mounts. Sticking to these restrictions will prevent your mount from sagging under the weight of a heavy TV or, worse yet, failing mechanically and causing damage or injury.

Another consideration is the mounting location and height. Make sure the mount can withstand the weight of your TV and any other equipment you plan to install (like sound systems or video game consoles). You may also need to install an electrical outlet where the wall mount will be mounted. It is a good idea to consult an electrician before beginning any electrical work.

Once you have settled on the location, use a stud finder to determine if there are studs in the wall where you plan to mount your TV. If there aren’t studs, it will be difficult to secure your mount and could lead to structural damage.

Next, choose a mount with a VESA pattern that matches your TV. This will ensure that the mount can support your TV’s screen size and type. Look for this information in the TV’s manual or on its manufacturer’s website.

Finally, consider the type of movement you want your TV to have. You might need a flat mount for a fixed position or a swivel or tilting mount for a more adjustable position. Finally, evaluate the wire management options offered by each mount to determine which one will work best for you. There is nothing that will detract from the look of your new TV installation faster than loose wires hanging down from the mount. Look for mounts that offer channels or clips in the body of the unit to keep wires neat and tidy.

Preparing the Wall

If you want to mount your TV to a wall, it’s a good idea to start with some planning. This can help ensure that the project is successful and also minimize the possibility of crooked or uneven mounting, which can detract from your viewing pleasure.

First, decide where you want to mount the TV and select an appropriate location. Be sure that you choose a spot that allows for comfortable seating and consider the optimum viewing angle and height for your TV (see our guide on the Best Place to Mount a Television for more tips).

Next, determine what type of wall you have. Drywall is the most common wall material, and fortunately, most mounts are designed to work with it. However, to support the weight of the TV and the mount itself, it’s important that your wall have studs (vertical pieces of wood) behind it. These will provide a strong anchor point, and they’ll keep your mount from falling off the wall.

If your home is an older type of building, it may have solid brick walls or concrete breeze blocks. These require special care and extra fixings, so it’s best to consult an expert before attempting to mount a TV on them. Newer homes and some conversions are often constructed from timber frames or plasterboard. Using these types of walls can be tricky as they don’t have the same structural integrity as a stud wall.

Once you’ve determined the type of wall, it’s time to prepare it for the mounting process. Begin by removing any electrical outlets or junction boxes from the area where you plan to mount the TV, and use a stud finder to locate studs in the wall. Be sure to mark the stud locations with a pencil so that you know where to drill your pilot holes for the mounting screws later.

If you don’t have a stud finder, remove the cover from an outlet or junction box and poke around with your finger to feel for any hollow spots. You can also use a screwdriver to test the wall by driving a screw into it. If it holds the screw securely, then you have a solid surface for your TV mount.

Mounting the TV

A mounted TV brings a sense of style to the room and elevates the viewing experience for everyone watching. It can also increase the amount of usable space in a room and help avoid the annoyance of wires running across the floor.

Before you do anything, make sure to turn off any circuit breakers in the area where you plan to mount the TV. You’ll also want to have a partner to help with this project and ensure that all measurements are accurate. You’ll need a stud finder, a power drill, and tools like a tape measure, screwdriver, and level to complete this project successfully.

Begin by locating the wall studs where you want to mount the TV. A stud finder is the easiest way to do this. Once you’ve found the stud locations, mark them on the wall with a piece of tape.

Most TV wall mounts come with a mounting template to help you determine where the screw holes will go on the back of your TV. The mounting template may include multiple hole options to compensate for the location of the studs on your wall. If not, you can usually use a ruler to estimate the position of the mounting holes.

The next step is to attach the mounting bracket to the back of your TV. The bracket will have screw holes that line up with four of the holes on the back of your TV. It is important to be aware of how far apart the studs are in your wall when mounting a TV, so you can purchase a mount that fits the distance between each stud.

Hollow-wall drywall mount installations can be limited to total weights (TV, mount, and all accessories) of 100 pounds or less. For a safe installation, use toggle bolts instead of regular screws on these installations.

If you have a smart TV, the height of the wall mount may impact the quality of the WiFi signal. It’s worth experimenting with different positions to see what works best for your home. Also, consider any other obstacles that could get in the way of a clear signal, such as nearby chimneys or large furniture pieces.

Ways to Install a Metal Fence

Fences

Many options are available, whether you choose a decorative or practical metal fence. Most metal fences are made of aluminum or tubular steel. The advantages of these materials include their lighter weight and ease of installation. They can also be purchased in complete panels, making the process even more convenient. Additionally, aluminum and steel fences are less expensive to produce and install. The following are some of the different types of metal fences available. The pros and cons of each type are briefly discussed.

Fences
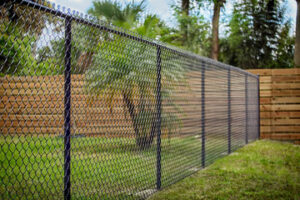
Before installing the metal fence, make sure you have marked your property’s perimeter with spray paint. Then, drive masonry stakes and stretch a string between them. Mark the position of your fence posts with the string and ensure correct spacing. Once you know this, you can cut your fence panels to fit the gaps. Professional Fencing will save you a lot of time and effort. After all, it’s worth the effort.

Metal fences can come in different types, depending on your desired look and level of detail. Some fences use hollow parts to hide fasteners, while others use solid panels that need concrete posts. While installing metal fences, remember to adhere to local safety codes and make sure that the fasteners are concealed. If you don’t have the right experience or expertise, you can call professionals to do the job for you.

Chain-link fencing is one of the simplest and cheapest types of metal fences. It is not as decorative as other options but is good for containing pets and children. It is also very flexible and can be installed around unusual property lines. In addition, it is resistant to corrosion. For all these reasons, many homeowners choose this type of metal fence. However, the maintenance of a metal fence depends on the material used to make it and on your region’s climate.

To install a metal fence, you must first install the posts. You can install them with the help of masonry screws. Once you have installed the posts, you can attach the rails. You can then attach the panels to the posts. After that, you can choose whether to use a preassembled panel or a DIY kit. Aluminum fencing is typically lighter than steel, so you will not have to spend a lot of time installing it.

The next step is to apply a protective coating. Unlike plastic fences, metal fences should be coated to prevent rust and other elements from damaging them. You can use an oil-based primer that is specially formulated for metal. Make sure that you apply two coats of paint to the metal fence, so that it is completely protected.

Aluminum and steel are two of the most popular metal materials for ornamental metal fences. Although steel is more expensive, it offers low maintenance and is recyclable. In addition, they are both lightweight, durable and corrosion-resistant. Aluminum is also 100% recyclable, making them an excellent option for a seaside property. There are many different types of metal fences available to suit your needs.

Steel and wrought iron fences are similar in appearance and strength, and both can last for decades. When choosing a metal fencing for your property, consider the style and color you’d like. Steel fencing is beautiful and classic, while wrought iron fencing offers an elegant and versatile look. You should decide between the two options based on how much you want your fence to be and how durable you want it to be.

Metal fencing is typically sold in rolls of twenty or fifty feet and can be installed easily. Each roll can be joined by unscrewing the wire on the ends. Its height can range from three to eight feet, but the fence can be customized to suit your needs. The mesh is usually nine or eleven-wire gauge, and the length varies depending on what you need.

Aluminum fencing is the most economical form of metal fencing. It is lightweight, easy to install, and can be designed to look decorative. It is also completely maintenance-free. However, it is not as durable as steel and is not recommended for security gates or commercial fencing. It is also more susceptible to rust, making it unsuitable for security-conscious premises.

Metal fences can come in different types, depending on your desired look and level of detail. Some fences use hollow parts to hide fasteners, while others use solid panels that need concrete posts. While installing metal fences, remember to adhere to local safety codes and make sure that the fasteners are concealed. If you don’t have the right experience or expertise, you can call professionals to do the job for you.