How Common Roof Repair Problems Can Destroy Your Home Or Business

Roof Repair

A roof is a critical part of any structure. Without it, your home or business would quickly deteriorate from the elements. Damaged roofs can cause leaks, mold growth, animal infestation, and lower resale value.Roof Repair

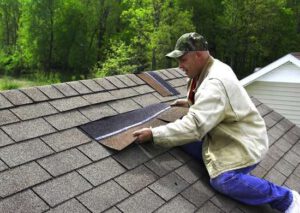
Regular inspections are crucial to spotting roofing problems before they become significant problems. Contact Roof Repair NJ for professional help.

A sound shingle roof needs a good layer of granules to offer UV, impact, and corrosion protection. But a number of common problems can rob your top of this vital layer.

Unsealed shingles are vulnerable to moisture and can allow water to seep into your home. Isolated cracks in shingles may be repaired with relative ease, but widespread shingle damage can signal the need for a full roof replacement.

Blistering is a more serious problem that causes dark stains on your roof. This symptom often points to inadequate ventilation in your attic or a deteriorating underlayment that’s allowing the heat of your home to melt the asphalt shingles.

Damaged shingles can also curl, creating an ugly, uneven appearance. Curling is often caused by a combination of factors, including high winds, improper installation, or poor ventilation. If left uncorrected, these problems can lead to leaks and other problems in your attic and throughout the house.

When shingles develop a concave center, or cup, the shingle becomes unstable and can eventually leak into your home. Cupped shingles also leave standing water that can cause mold and mildew, and the moisture can penetrate into your attic.

A common repair involves installing a new shingle over the old one. To do this, slide a flat pry bar under the damaged shingle and pry it loose. Carefully peel back the shingle layer above it, and use a catspaw pry bar to break the seal with the shingle underneath (this will require you to go two shingles up-roof). Pull out the damaged shingle and replace it with a new one. Use a caulking gun to inject roofing tar beneath the shingle for extra support.

If you’re replacing a badly torn shingle, it’s important to match the color of the replacement with your existing shingles. This can be tricky, but it’s often possible to camouflage the repair by examining the gutter for colored granules that have washed down from your roof. If you find a matching granule, you can sprinkle it over the new shingle to hide the repair.

Damaged Flashing

Flashing is a thin material that prevents water from seeping around chimneys, vents, skylights and other roof penetrations. It is commonly made from metals such as galvanized steel, copper or aluminum and helps to keep moisture away from these areas of the roof. Flashing is designed to be tough, but it can show signs of damage over time due to exposure to harsh weather conditions such as hail, acid rain and severe winds. In coastal neighborhoods, exposure to salt air can also degrade roof flashings.

Flashing problems range from small cracks and holes to rusted through or bent sections. It is important to watch for any discoloration on the wall or ceiling near where roof flashing is installed and also leaks during rainfall. Small holes may be easily repaired with roofing cement or roof caulk, but if left untreated, these tiny holes will turn into larger ones that allow rainwater to seep into the home.

In addition, a leaking roof can lead to corrosion of the flashing, which is a problem that requires a professional repair service. Faulty flashing can cause water to corrode through the shingles and into the attic, causing mold and mildew. It is also possible for a leak to run down the interior walls and into rooms that are not directly under the leaking flashing.

Even though it is not always possible to spot a problem with the flashing from the ground, it is important to have an annual visual inspection by a professional roofer to check for any damage or areas where moisture may be getting in. The expert roofer will be able to recommend a thorough repair for any areas of concern.

If the roof flashing is completely compromised, it will need to be replaced. It is important to have a professional replace the flashing immediately to ensure that moisture does not get into the attic and other parts of the home. The roofer will remove the affected shingles, expose the flashing and then install a new section of flashing that is properly sealed to the roof deck.

Damaged Pipes

Pipes that burst are one of the most destructive problems a homeowner can face. Leaking pipes cause water damage to walls, floors, ceilings, and furniture, and can also lead to mold and mildew that require expensive repairs. The longer a leaking pipe is left unattended, the more severe the problem will be. This is why it’s important to take action as soon as you notice a leaky pipe in your home or business.

There are a few ways to fix a damaged pipe, depending on where it is located. If the pipe is in a wall or ceiling, it may be possible to access it without opening any walls or removing any finish materials. In this case, you can use a pipe repair clamp or silicone or rubber seal tape to stop the leak. This is a temporary repair and should only be used until a plumber can arrive to evaluate the situation and make a more permanent repair.

If the pipe is outside, you can turn off the water using a local shutoff switch or the main water supply valve. Once the water is off, you can remove any waterlogged items and clean up the area around the pipe. Then, apply epoxy putty to the damaged pipe and joint. Make sure the area is completely dry before applying epoxy, and follow the manufacturer’s instructions for application and curing times.

Once the epoxy is cured, you can reconnect the pipe. If the pipe is exposed, you can use a coupling to connect it to the replacement pipe. If the pipe is behind a wall or ceiling, you will need to use a drywall saw to cut out the affected section of drywall and gain access to the pipe. After you have removed the drywall, use plumber’s flux to prepare the surface of the new coupling and the end of the replacement pipe. Then, solder the joints together.

A more permanent solution is to replace the damaged section of pipe with a new piece of PVC pipe. Before you start, you will need to shut off the water supply and make sure the old pipe is fully disconnected from all fittings. Then, use a gas torch to heat the copper pipe and the replacement coupling until they melt together. Next, feed solder into the joint and continue until it is filled with a smooth, watertight seal. Once the joints are sealed, you can reconnect the water supply and turn the water back on.

Damaged Soffit

Soffits are a crucial part of any sloped roof, acting as the skin that covers a roof’s eaves. They do a variety of tasks, such as protecting the inner roofing structure from moisture damage, helping with attic ventilation through small perforations, and supporting rain gutters that help keep water away from the fascia boards.

If you see soffit signs of damage, such as rot or a dark coloration, it is important to repair the damaged area promptly. Otherwise, you could experience serious structural problems that would require more costly repairs in the future.

Depending on the severity of the soffit damage, you may need to replace entire sections. This isn’t a project for a beginner, especially in older homes where builders used solid wood soffits. If you’re repairing a soffit in such a case, it’s best to hire a professional carpenter.

The soffit is located below the edge of the roof overhang, and it’s usually connected to the fascia with screws or nails. The soffit is a good place to start your roof repair because it is the first area of your roof that will show obvious signs of wear and tear, such as rot or discoloration.

You’ll also want to check the fascia board underneath the soffit for signs of wear and tear. A rotting or warped fascia can lead to further problems down the road, including leaks and water infiltration. Look for rot, dark discoloration or even cracks and chips on the fascia board.

The soffit is also home to different types of animals and pests, such as squirrels, rats, birds and more. Look for gnaw marks, droppings and nesting materials to find out if the soffit is infested by any of these creatures. They can wreak havoc in the attic and throughout the house if not dealt with promptly.

Commercial Painting Is All About The Details

painters

A fresh coat of paint is a great way to update the look of a commercial property. Painting a commercial property differs from painting a home, requiring additional preparation to keep the project running smoothly. It is important for painters to be punctual and to communicate clearly with clients. This demonstrates professionalism and reliability and helps to build trust.

Preparation

paintersWhether you’re running an office, retail shop or some other business, keeping your place of business in tip-top shape is important for customer perception and company profitability. A fresh coat of paint can go a long way toward making your space look great and encouraging people to return. Having the right painting contractors on hand can make all the difference. Choosing a professional who understands the ins and outs of Commercial Painting Perth can save you a lot of hassle.

Unlike residential painters, who can work on projects at any time, commercial painters usually work only during business hours so that they don’t disrupt customers and employees. This can mean a lot of extra planning and scheduling. It also means that you need a contractor who can handle a larger workload than a homeowner, and has the experience to manage large crews and complex equipment.

Another big difference between commercial and residential painting is the type of materials used in each job. Commercial structures typically are made from more complicated materials than homes, and require specialized coatings to ensure that the paint will stick. A professional contractor will be familiar with the ins and outs of all kinds of materials, and will know how to prepare them correctly for a paint job that lasts.

Commercial painting can involve interior or exterior painting at a wide variety of businesses, including offices, apartment complexes, hospitals and hotels. This may include walls, ceilings, trim and other surfaces. Having the right painter on hand will help you create a space that reflects your company’s image and values, and attracts customers.

You can tell when a paint job has been done professionally — the lines are crisp and even, there’s no evidence of drips or spills. Professional painters also take color into consideration, and can recommend the best colors to match your brand or help you choose an appealing color scheme that will attract customers. They can also provide you with a detailed quote and schedule that takes your specific business needs into account.

Application

Commercial painting is a fast-growing industry. Whether due to renovations or simply a desire for a fresh new look, businesses are always looking for ways to improve their appearance. This often means hiring a professional painter to provide quality service that will impress customers and attract more business.

While commercial painting is a lucrative career option, it also comes with its fair share of challenges and responsibilities. For one, it requires specialized tools and equipment that aren’t readily available to the average person, including power washers, sandblasters, paint sprayers, and ladders. In addition, a commercial painter must be comfortable with a variety of surfaces and paints, from metal to glass.

A strong work ethic is essential for any professional painter. This includes a willingness to learn and apply new techniques as well as the ability to manage multiple projects at once. In addition, a commercial painter needs to be reliable in terms of both timeliness and communication. If a crew member is not punctual, it can disrupt the entire process and cause delays for everyone involved.

Lastly, it’s important for commercial painters to be receptive to feedback and opinions from both clients and colleagues. Feedback is a critical part of the collaboration process, and it helps improve a project’s overall outcome. While it can be difficult to accept criticism, a good commercial painter will embrace feedback and use it to improve their work.

Running a successful painting business doesn’t have to be stressful. With the right software, you can streamline your daily operations and save time. With the help of app integrations, you can manage your accounting, client communications, and job site scheduling all from one platform. Try an application like Jobber, which allows you to quote from anywhere, communicate with your clients via email or video conferencing, and get invoices paid online. It can even automate repeatable admin work, such as quoting follow-ups or visit reminders.

Another tool is Fleetsharp, a fleet management app that lets you map out more efficient routes for your crew to reduce fuel costs and deliver better customer service. Moreover, it can integrate with apps like QuickBooks Online to ensure you run a tight ship. Lastly, if you’re looking to grow your business and attract more leads, consider using an online lead-generation website and app like Thumbtack. This platform connects clients with professionals based on reviews and other data. It charges an annual fee to list your services and generate leads, but it’s a great way to get more painting jobs and clients.

Finishing

The finishing phase of commercial painting is all about the details. This includes everything from ensuring that each surface is thoroughly cleaned to making sure the paint job is smooth and even. A high attention to detail is critical for a successful commercial painter, and it will help them complete each project on time and within budget.

The type of paint used also plays a role in the difference between commercial and residential painters. For example, industrial paints typically have higher durability ratings and are designed to withstand harsh working conditions. Commercial painters may be more familiar with these types of paints, and they’ll likely have experience using different handling techniques to apply them quickly and efficiently.

A commitment to continuous improvement is a vital part of any professional career, and commercial painters are no exception. There are always new tools, techniques, and equipment that can improve the quality of work and increase productivity. A commercial painter who is willing to learn and adapt will be more prepared for the challenges that come with each project.

Reliability is a crucial trait for commercial painters, as they’re often working on projects that require them to be available for business hours. If a painter is unreliable, it can throw off the schedule of everyone else involved in the project and lead to costly delays. Punctuality is also important because it demonstrates reliability and respect for others, which helps create positive working relationships.

Another important trait for commercial painters is being receptive to feedback and opinions from other team members. This will help them make improvements to their work and develop a better reputation in the industry. Additionally, it’s important for commercial painters to be able to recognize the difference between constructive criticism and destructive comments.

A commercial painting contractor has the specialized knowledge, experience, and equipment needed to handle large-scale painting projects at business facilities. They can provide thorough consultations and ensure that all necessary requirements are met while taking your facility’s architectural style, surroundings, and use into account. In addition, established commercial contractors will have established relationships with a variety of suppliers, so they’ll be able to offer competitive pricing on a wide range of products and services.

Maintenance

The paint that covers a commercial building provides more than just aesthetic appeal. It also protects the structure from weather, water damage, and insects that would otherwise destroy its woodwork. Keeping this protection intact requires routine painting. If you’re a facilities manager or business owner, keeping up with this maintenance is key to getting new customers and maintaining a competitive advantage.

A professional commercial painting contractor will use fast-drying, low-VOC, or no-VOC products to minimize the presence of dangerous fumes in a space that needs to be occupied during the project. They can also work around your business’s schedule to ensure minimal disruption for staff and visitors.

When choosing a commercial painting contractor, make sure they’re experienced with completing projects on your type of building and understand how to deal with the challenges that come with the unique layout. The contractor should also be familiar with the local environmental regulations that might affect your project.

Once the painting is complete, you’ll need to regularly inspect the building’s exterior and interior for signs of wear or damage. This inspection will help you identify any problem areas early on, so that they can be addressed sooner rather than later. This will save you money by reducing the risk of larger repairs and maintenance expenses in the future.

Performing a monthly inspection of your property’s paint is the best way to catch fading and chipping before they turn into more significant issues that could threaten the structural integrity of the building. You should also look for the presence of mold, mildew, and rust, as these can damage the surface of your paint and may even threaten your building’s overall safety.

As a business owner, the appearance of your building is the first thing that potential customers will notice. A professional-looking storefront with a fresh coat of paint will instantly pique their interest and draw them in. But if your paint is peeling, it’s not just unsightly; it can leave the wood vulnerable to rain and other weather damage that will eventually rot the building. In short, a damaged storefront or building will scare off potential customers and harm your reputation in the community.


How Much Does Insulation Removal Cost?

insulation

Insulation removal may be necessary for various reasons, including pest infestation, mold growth, water damage, and more. Damaged insulation can affect energy efficiency and lead to health issues if contaminated with rodent droppings or urine. Professional Perth Insulation Remover is trained in safety protocols and can help minimize cost by safely removing insulation materials for you. The insulation removal cost can vary significantly depending on the type of insulation and attic size.

Labor

insulationInsulation removal can be a complex and time-consuming process. It requires special equipment and knowledge to do it properly. This is why many homeowners choose to hire professional insulation removal services. This can save them a lot of time and energy. In addition, it ensures that the job is done correctly and safely.

If there are any hazards in the insulation, such as mold or asbestos, professionals must take extra precautions and may need to quarantine your home for a designated period of time. Additionally, if the insulation contains rodent droppings or urine, the contaminant must be removed and the attic must be cleaned before new insulation can be installed.

The preferred method of removing insulation is by machine. Professionals use a vacuum system that uses a hose to suck up the insulation from the attic. This process is much faster and more efficient than bagging and removing the insulation by hand. It also prevents airborne contaminants from being reintroduced into the home during the removal process.

If the insulation is contaminated with hazardous materials, it must be removed and replaced by professionals. This is often the case when there are signs of mold or rodent droppings. If left unchecked, these contaminants can lead to health problems and poor energy efficiency.

For homeowners who prefer to remove the insulation themselves, a DIY approach can be a cost-effective option. However, it is important to understand that this can be a messy and dangerous project. It is essential to take proper safety precautions and wear appropriate protective gear, including rubber-coated gloves, a mask, or respirator, and goggles. It is also necessary to cover the floors and walls of the attic with a protective covering.

It is also a good idea to purchase a commercial-grade insulation removal vacuum and a ladder. In addition, you should have a HEPA-filtered Shop-Vac and 50-gallon waste bags, as well as a rake and dustpan for cleaning up the mess after the removal process is complete. Homeowners should also make sure they have a suitable place to dispose of the old insulation, such as a large dumpster or local recycling center.

Equipment

Insulation is an important part of a home’s structure. It helps keep the interior of the home comfortable, reduces energy bills, and adds to the resale value of the property. It can also help to control pests and mold. However, over time insulation can lose its effectiveness and need to be replaced. This is especially true for older homes that may have rodent infestations or significant contamination. When replacing insulation, the old insulation must first be removed to allow for a clean and proper installation. This is an arduous and time-consuming process. The cost of this step will vary depending on the type of insulation being installed and how damaged or infested the existing insulation is.

The removal of old insulation can be done either by hand or by machine. Hand removal is typically done for batt insulation, a type of rolled insulation made of fiberglass. Machine removal involves using a vacuum to suck the insulation out of the attic and into a machine that shreds it. The resulting waste is then deposited into a dumpster outside the house.

For this process, a commercial-grade insulation removal vacuum must be used. These vacuums are gas-powered and typically come with around 150 feet of hose to reach from the attic to the outside of the home. If the vacuum is not professional-grade, it can quickly clog, adding to the overall cost of the project.

Other equipment that is often required for this process includes a ladder, a pair of work gloves, a respirator mask, and a dustpan. The respirator mask is essential because it will protect the lungs from airborne particles of mold and other toxins. The pair of work gloves will prevent the hands from becoming irritated and itchy during the removal process. A dustpan is also used to remove any remaining debris that is unable to be sucked out of the attic.

In addition to the equipment, other factors that can add to the overall cost of an insulation removal are obstacles and hazards in the attic that will need to be navigated or removed prior to removing the insulation. These may include ductwork, wiring, or other structural elements. It is also possible that the insulation is contaminated by animal droppings or other hazardous materials. These contaminants can be stirred up by the vacuuming process, releasing toxins into the home.

Materials

Insulation is made of a variety of materials, including fiberglass, cellulose and mineral wool. Fiberglass insulation is commonly used in blown-in and roll/batt type formats, while cellulose and mineral wool are commonly found in rigid board and duct insulation forms. Other types of insulation include spray foam, which can be installed over the existing material or used in gaps and crevices to create an air seal. The type of insulation your home needs will depend on your climate, the R-value you require and any other insulation needs that may exist (e.g., a vapor barrier or soundproofing).

The cost of the materials you need to purchase to remove your old insulation will vary depending on the type you choose, whether you opt for DIY or hire professionals to handle it, and the size of your attic. In general, you will need a ladder, a commercial-grade insulation removal vacuum and an assortment of supplies for the job, such as commercial waste bags, HEPA filter shop vac, 50-gallon garbage bags, rakes, dustpans, and a hose with a large attachment for reaching hard to reach areas. A pair of rubber-coated gloves and a respirator or surgical mask are also recommended to protect yourself from the toxins released during insulation removal.

While removing your own insulation, it is also a good idea to spread plastic sheeting in the attic space over things like wires and ductwork, so that these items are not disturbed. If you decide to partner with professionals for your insulation removal, they will have the necessary equipment and safety gear.

Over time, your home’s attic insulation may lose its even distribution due to home service providers working in the attic, or from animals living in the space and stomping down parts of the attic. This can lead to thicker and thinner areas in the attic, as well as pockets of moisture that are not conducive to the blown-in or vacuuming method of removing insulation. The attic must also be clear of obstructions that can interfere with the vacuuming process, such as slats and nails from previous roofing or other home construction projects. In some cases, insulation may be contaminated by mold or other dangerous substances that will add to the overall removal and disposal costs.

Additional Services

If the attic insulation is damaged or contaminated, you may need to hire professionals for remediation services. These services include removing and disposing of mold, rodents, and other pests that can contaminate your home’s environment. These contaminants can affect the health and safety of your family, so they must be removed and disposed of properly. These additional costs can significantly increase the overall cost of attic insulation removal.

Before the contractors arrive, you can save money by preparing the attic yourself. This includes covering the attic access door, creating a clear pathway to the attic and removing items that could be in the way of the workers. You can also save money by bringing your own tools, equipment, and supplies to the job site.

Insulation removal is a demanding DIY project, and it’s important to consider the costs of labor and equipment rental. Obtaining quotes from several companies can help you determine how much the project will cost and which contractor offers the best value. You should also compare the types of services offered by each company, including whether they offer bundled packages or discounts for multiple projects.

Professional attic insulation removal is typically more expensive than DIY removal, but it’s well worth the investment to ensure the job is completed properly and safely. These professionals have the experience, specialized equipment and expertise to remove the insulation in an efficient manner. They can also prevent damage to the attic and other parts of your home, which can result in higher energy bills.

When hiring an insulation removal service, you should consider whether the company offers a warranty or guarantee on its work. A guarantee will give you peace of mind that the company stands behind its work and will fix any problems with the installation. A warranty should also cover the labor and material cost of removing the old insulation and installing new insulation.


Why Residential Carpet Cleaning Is Important

carpet cleaning

Residential carpet cleaning helps to extend the life of your home’s soft surfaces. It removes the grime that accumulates with everyday wear and tear, spills, pet messes, and general dirt. It’s important to develop habits that stop dirt at the door, such as placing mats outside and inside entrances and encouraging everyone to take their shoes off. It’s also essential to schedule regular preventative residential carpet cleaning from https://www.joondalupcarpetcleaners.com.au/.

Improves Indoor Air Quality

carpet cleaningCarpets act like giant air filters, trapping various pollutants that enter indoor spaces from the outside. Some of these include dirt, dust, pet dander and hair, bacteria, and mold spores. Over time, these pollutants can build up and negatively affect indoor air quality. If you have family members with respiratory illnesses or allergies, this can pose a serious health risk for them. Residential carpet cleaning can help eliminate these pollutants and keep your family healthy.

If you don’t clean your carpets properly, they may start to deteriorate and create an unpleasant environment. Dirty carpets can also become a breeding ground for dust mites, which are notorious for causing respiratory problems. Residential carpet cleaning helps to prevent the spread of these insects by removing their food source, house dust.

When you clean your carpets, the vacuuming and cleaning methods used should be safe for your family and the environment. Many DIY cleaners use harmful chemicals that can leave a residue behind, contaminating the environment with dangerous volatile organic compounds (VOCs). The best residential carpet cleaning services employ green carpet cleaning methods that are free of VOCs and other toxic substances.

Professionals use special equipment to perform hot-water extraction, or steam cleaning. First, they pre-condition the carpet with a solution that loosens stains and debris. Then, they use a high-pressure hose to spray the carpet with extremely hot water, rinsing away dirt and other contaminants. They also use high-powered fans to speed up drying and reduce the chances of mold or mildew growth.

As carpet becomes more and more popular, people are becoming more aware of the impact that dirty carpets can have on their indoor air quality. In fact, studies show that when carpets are regularly cleaned, they can improve indoor air quality significantly. So don’t wait until your carpets look dirty to have them cleaned. Contact a reputable residential carpet cleaning service today to schedule an appointment. And don’t forget to open windows and use fans to maximize ventilation during and after your carpet cleaning to help it dry faster. This will also improve your indoor air quality and allow you to enjoy the benefits of a clean, fresh-smelling home.

Enhances the Appearance of Your Carpets

Carpets are an integral part of any home or commercial space, adding warmth and style. They also act as a filter, trapping dust, dirt, and other unwanted debris. However, they can only hold so much before they start to look dirty and dingy. This is why it is important to get your carpets professionally cleaned on a regular basis. Residential carpet cleaning not only removes the dirt and debris embedded in your carpet, but it also helps to restore its color and texture.

Dirty and dingy carpets can make an entire room look messy, even when the rest of the furniture and other features are clean and well-maintained. When you have clean, beautiful carpets, it gives visitors and guests a positive first impression of your home or business. In addition, regularly cleaning your carpets can help prolong their lifespan by removing the damaging soils that cause them to break down faster.

Professional residential carpet cleaners use high-quality, effective products to get your carpets looking like new. These products contain oxygen, which breaks up dirt and detaches it from the fibers of your carpet. They also contain encapsulators, which create microscopic sodium crystals around the broken up debris and prevent it from reattaching to your carpet. These crystals make the debris easier to remove during your carpet’s extraction process, and they also help to reduce the amount of water used in the cleaning process.

When you have clean, bright carpets, they will also be easier to maintain. Regular vacuuming and spot removal can keep your carpets looking and smelling great. You can also extend the life of your carpet by avoiding excessive foot traffic and using rugs or other floor coverings in high-traffic areas.

If you have just moved into a new home, getting the carpets professionally cleaned is an excellent way to give it a fresh start. Carpets are prone to trapping all sorts of bacteria and other nasty things, and a dirty carpet can release these harmful substances into the air when you walk over it. This can pose a serious health risk, especially for people with respiratory problems.

Makes Your Carpets Last Longer

Carpets make the home cozy and comfortable but they can also trap a variety of potentially harmful substances, such as allergens, pesticides, germs and dirt. These substances can trigger health problems and contribute to odors in the house. They can also cause stains and deteriorate the fibers of carpet. Having your carpets cleaned regularly prevents these problems and helps them last longer.

Residential carpet cleaning is the process of removing soils from carpets using hot water extraction. Professional cleaners use SOA-certified cleaning solutions that clean carpets without damaging them or causing them to resoil quickly. They can also provide carpet protection treatments that keep them looking better and feeling softer. If you want your carpets to last longer, have them professionally cleaned regularly, vacuum them often, put down mats and rugs at entranceways and encourage everyone in the household to take off their shoes inside the house.

One of the best things you can do to extend the life of your carpet is to vacuum it regularly, at least twice per week. This will remove loose dirt on the surface of your carpet before it can settle deep into the fibers and start to abrasive them. When you vacuum, go over each area several times and in different directions to ensure that all dirt is removed.

If you have pets, be sure to vacuum frequently as well, especially under furniture where pet hair can hide. In addition to regular vacuuming, use a specialized pet brush or a rotating vacuum attachment to clean the pet hair from the carpets.

The frequency of carpet cleaning depends on how much foot traffic your carpets get. Heavy traffic areas should be vacuumed more frequently than low-traffic areas. Carpets should be cleaned as soon as they begin to look dull and dingy, rather than waiting until they are completely filthy. If you wait to clean your carpets until they are dirty, it will be more difficult and expensive to get them clean.

If you take good care of your carpets, they can last for 15 years or more. However, excessive wear, matting, fraying or irreparable stains may necessitate replacement earlier.

Makes Your Carpets Look Like New

A home’s carpet is a major investment, and you want to keep it looking its best. Keeping up with regular cleaning is the best way to do that. A professional cleaner uses eco-friendly materials that will ensure your carpets look new for as long as possible. The cleaning process also eliminates any stains that may be on the carpet, preventing them from becoming permanent. The result is a clean and fresh looking carpet that will add to the overall appearance of your home.

Few elements of your home will last forever, but a well-maintained carpet can last for years. Vacuuming is one of the most important parts of carpet care, but even a thorough vacuuming will only remove about 75 percent of dirt and debris. A professional carpet cleaner will use a hot water extraction method that removes more dirt and debris. They will also use pretreatment to address spots and stains. These products break down the stain and lift it from the fibers, allowing the cleaner to penetrate deeper.

Once the carpet is clean, it should be allowed to dry completely. It is a good idea to keep children and pets off of the carpet until it is fully dry, as walking on it will flatten the fibers and increase drying time. If you are worried about the length of time it takes for your carpet to dry, you can always buy an air mover to help speed things up.

Regularly maintaining your carpets with weekly vacuuming and professional deep cleaning will prevent them from needing to be replaced too soon. This will help you save money in the long run and can prevent the stress of finding a replacement that matches your interior decor.

Having clean carpets can be a great thing for your family, but the reality is that it can take a lot of work to keep them that way. If you are tired of spending all day trying to clean your carpets and still not seeing the results you want, it’s time to call a residential carpet cleaning service. A professional carpet cleaner will use a process that will leave your carpets looking like new and smelling fresh and clean.


How a Log Home Professional Can Protect Your Investment

Richardson Log Homes LLC can help you keep your logs looking their best and protect your investment for the long term. They will have experience with the special needs of log homes and can provide a cost analysis for your project. The most common reason for rot and insect damage to log homes is due to homeowners not following the recommended maintenance instructions for their stain and finish. This is an easy problem to avoid with regular maintenance.

Staining

log home restoration

Stains do more than make log homes look beautiful – they provide a layer of protection for the wood. This protects it from dirt, water and chips. It also helps block UV rays that can damage the wood and cause mildew or rot. Stains are available in a wide variety of colors and finishes. They can be applied to bare wood or over an existing coat of stain, although the surface must be prepped properly for best results.

Ideally, staining should be done when the weather is clear and dry. This will allow the first coat to penetrate and adhere to the wood. After the stain dries, it should be back brushed to help it look even and prevent streaking. The next coat is then applied and allowed to dry. Repeating this process of sanding and applying stain allows you to get the most longevity from your log home stain.

It is important to inspect your cabin regularly and re-stain it every 4 to 6 years depending on your climate and exposure. If your cabin has large cracks or checks (checking is normal for old wood) these should be caulked. This will prevent rain from soaking into the wood, causing mold, mildew and/or rotting. It is also critical to look closely at the areas around doors and windows as they are more prone to leaks.

When selecting a stain for your cabin it is important to choose a product designed specifically for log and timber homes. These products are formulated with the highest quality ingredients to improve the water repellency of the wood. They will also offer the longevity needed to help protect your investment well into the future.

Staining is a time consuming project and requires careful prep work. If the surface is not prepped properly, none of the products on the market will perform as promised. The prep process starts by washing the logs or wood to remove any dirt, dust or debris that may be present. This is followed by sanding the logs or wood with a random orbit sander to smooth the surface and prepare it for re-staining.

Chinking

One of the most important things you can do for your log home is chinking. Chinking is the seal that prevents moisture, wind and insects from entering your home. It also keeps your logs from rot. It is not only functional but it adds to the character of your cabin. There are many different types of chinking on the market today but the best type for your log home is Triple Stretch. This chinking is available in a wide variety of mortar colors to match your logs or create a contrast that highlights the uniqueness of your log home.

Chinking is done in a similar way as caulking but there are a few differences. First, you will need to clean the logs. This can be a very tedious task but it is necessary to ensure that your chinking adheres properly. It is best to do this in the spring when your logs are clean and dry.

Next, you will need to use a backer rod or make your own. This is a rod that is inserted into the lower logs to create a barrier. It helps keep the chinking from sticking to the lower logs and allows it to adhere to the top. It is best to do this with galvanized nails and to nail it in every 2-3 inches.

Once you have completed the backer rod you will need to install your chinking. There are a few different methods to do this and none are better than the others, it just depends on your comfort level. Regardless of which method you choose to use, make sure that the chinking is installed evenly. You want to make sure that it is completely filled and no gaps are left.

While chinking isn’t as easy as staining your log home it is an important step that can be accomplished by most people. However, if you are uncomfortable with this type of work or do not have the proper equipment it may be best to hire a professional. They will have the tools and experience to complete this important task in a timely manner and with excellent results.

Waterproofing

One of the most overlooked steps in the log home restoration process is waterproofing. This step protects the logs from moisture infiltration that can cause rot, mold and mildew. It also helps prevent UV breakdown of the wood, protecting it from the sun’s harmful rays. This step is a must for all log homes, but is particularly important in areas of the home where moisture can enter, such as gable dormers and chimneys.

Moisture is a log home’s biggest enemy. Log cabins are very porous and without proper protection, moisture can wreak havoc in many ways including:

Waterproofing the entire exterior of a log home is the best way to prevent moisture from penetrating the interior of a log cabin. This can be accomplished through various methods, but is most commonly achieved through chinking and caulking.

Proper waterproofing should be done by an expert, and should include all areas of the home, especially the underside of logs where moisture can easily accumulate. It is also important to make sure that all roof areas are properly flashed. In addition, gutters should be installed to direct rain away from the walls of the cabin.

Any staining or chinking should always be followed by a preservative that penetrates into the wood and makes it toxic to most wood-destroying insects. Some of the best preservatives for log homes are borates. They are very effective and relatively inexpensive. They are very useful for log homes in areas that have a lot of precipitation and humidity.

When a log home is restained and resealed, the new finish should be treated with a preservative that will protect it from mold and mildew, as well as insect damage. This should be applied in a timely fashion, as it is very difficult to remove fungus and insect infestation once they have penetrated into the wood.

It is also a good idea to apply an additional preservative to any area of the home that has bare wood showing. It is important to choose a preservative that takes a stain well, such as the Outlast Q8 Log Oil or Energy Seal.

Siding

If you’re going to hire someone to do the work on your log home, be sure they’re experienced and qualified. Look for references and photos of previous work they’ve done on log homes. They should also be able to explain the process and answer any questions you might have. If they can’t, move on to another company.

Log home builders have a passion for these unique one-of-a-kind homes and have dedicated themselves to mastering the techniques involved in building and restoring them. They’re often able to provide you with a detailed proposal that includes an estimate of the cost of each task and an overall estimate of the project completion date.

Using premium products, a skilled contractor can restore your log home to its original beauty and protect it against moisture damage. This can increase the life expectancy of your home by up to 300%.

To apply a stain or clear coat, the contractor will use hand or airless sprayers to ensure even coverage and smooth application. They will be sure the weather is dry before applying and will work in sections that can be quickly cleaned or rinsed. They may also chink and caulk in between the logs and trim as needed.

Wood siding is prone to many kinds of damage. Wind, rain, insects, and sun can all take a toll on it over time, making the logs loosen and warp. To keep your log home looking its best, it’s important to understand the different types of damage and know how to spot them.

Some signs of a problem with your logs are mold or mildew growth, blown in dirt and dust, and even deterioration of the wood. When a problem occurs, it’s essential to act quickly in order to prevent further damage and to save the rest of the home.

Some log home owners decide to do the work themselves rather than hiring a professional. While this may seem like a cheaper option, it’s often not worth the effort in the long run. Without the proper tools and knowledge, they’re likely to damage the logs, causing them to lose their structural integrity and value.

Signs That You Need Sewer Line Repair

plumbing

plumbingIf you experience clogged drains, you may need to schedule a sewer line repair. Your plumber will run a camera through your pipes to identify the problem and locate any cracks, holes, or collapsed sections of the pipe. There are several different methods for sewer line repair, including trenchless options. These methods minimize excavation and allow your plumbing professionals to complete the repair quickly. Visit https://bryco-plumbing.com/ for more information.

Corrosion is one of the leading causes of sewer line failure, and it can cause a lot of damage in a relatively short amount of time. It happens when metals like iron come into contact with water, creating a chemical reaction that slowly wears away at the pipe walls. This results in tiny holes that, over time, can grow into big leaks.

A corroded pipe can also allow waste to seep into your home, causing serious issues with your plumbing and your health. For example, lead and other toxic metals can leech into your drinking water if the pipes are corroded and leaking. This can cause a number of health problems, including anemia and liver damage.

Luckily, you can often prevent corrosion by using a water filter or installing a water softener. These devices can help to remove minerals that create buildup and sludge in your pipes, which can cause them to corrode faster than usual.

In addition, you can minimize your chances of corrosion by getting regular inspections of your sewer line from a licensed plumber. These inspections can catch small problems before they become bigger ones. During an inspection, your plumber will use a video camera to examine the length of your pipe, looking for cracks and other problems.

Once a problem is found, your plumber can recommend the best course of action. There are several ways to repair a sewer line, and the method chosen will impact the overall cost of the job. Traditional methods involve digging large trenches to find and replace the entire line, which can be expensive and disruptive to your landscaping and hardscaping. Trenchless repair options, on the other hand, can be much less invasive and save you money in the long run.

For instance, CIPP is a trenchless technique that involves inserting a flexible liner into your existing pipe and inflating it to seal any cracks or holes. This method can restore your pipe to almost new condition and costs $80 to $250 per foot. Another trenchless method, spin-casting, uses a resin that is sprayed inside your damaged pipe to strengthen it and prevent future leaks.

Tree Roots

Trees are lovely and add value to your property, but they can cause major problems with sewer lines. If a tree is too close to the line, its roots will grow into it and cause blockages. This can lead to slow drains, gurgling toilets, and other issues. A professional plumber will be able to diagnose the problem and fix it before it worsens.

A common sign that tree roots are causing damage to your sewer line is the presence of soft or soggy spots in your yard. These are caused by water that is leaking into the ground from a broken pipe, often near where the pipe connects to your house. You may also notice a foul smell coming from your drains. This is caused by the rotting of the inside of the pipe from the presence of tree roots.

When tree roots enter your sewer pipes, it is very difficult to remove them. The roots will always grow back unless they are cut or killed, and a professional plumber will be the best option for this. A plumber will be able to use a machine called a mechanical auger to break up and cut the roots, or they can use a chemical like copper sulfate to kill the roots. Once the roots are dead, a plumber will be able to install new pipe and seal the area where the old pipes were.

There are several ways to prevent tree root invasion of your sewer line, including working closely with a landscaper when planning new landscaping. Experts recommend planting trees far enough away from your sewer line so that their roots don’t grow into the pipe. They will also advise you to choose varieties that have less invasive root systems, such as fringe or amur maple trees.

If you suspect that tree roots are damaging your sewer line, call a plumber right away. A plumber will be able to assess the situation with a plumbing camera and repair any damaged areas of the line. The most severe damage will require digging up and replacing the entire line, but even relining or replacing sections of the line can help to protect your home from costly root damage in the future.

Sewage Smells

The sewer smell that reminds us of rotten eggs is hydrogen sulfide, and it can be a sign of serious plumbing problems. This unpleasant odor is caused by rotting waste, and it can enter your home through pipes that are broken, cracked, or clogged. Whether the problem is a faulty seal or a major pipe leak, it needs to be addressed as soon as possible.

Hydrogen sulfide is a colorless gas that can kill people and pets, so it’s important to stay away from the area until the plumber arrives. If you can’t get away from the odor, open all the windows in your house to let it escape. If the odor is coming from the basement, try running water in the bathtub or shower to flush out any residue that might be blocking the sewer vents.

Some sewer line problems can be easily fixed by a DIYer, such as a missing wax ring that allows sewage gas to seep into the home. If the toilet is leaking around the flange, you can replace the wax ring to create a tight seal and block the smell.

However, many other issues require the expertise of a professional plumber to solve. A damaged sewage line can result in mold and mildew, which are both hazardous to your family’s health. These substances can damage the foundation, walls, and ceilings of your home.

Regular preventative maintenance is one of the best ways to keep your plumbing system functioning properly. A plumber can perform a yearly inspection of your drains to reduce buildup and detect any issues before they become major problems. By taking these measures, you can minimize your need for sewer repair. However, even the most preventative plumbing system can suffer a problem at any time. When you notice a foul odor, it’s crucial to call a plumber as quickly as possible. If you wait, the problem will likely worsen. This could lead to a sewage backup, which is much more difficult and costly to fix than it would be with early intervention. A plumber can also help you set up a preventative plumbing maintenance schedule to reduce the need for repairs in the future.

Mushy Yards

Having a muddy yard can be a real pain for homeowners. Not only does it look messy, but it also makes it difficult for family and friends to enjoy the outdoors. Luckily, there are many solutions for tackling this problem. One of the most common causes of a wet yard is a broken sewer line. If the line breaks, it can cause sewage to back up into your home. To avoid this, you should always pay attention to the following signs that your sewer lines aren’t working properly.

The first sign of a failing sewer line is slow draining. While it’s possible that this is caused by a minor clog, it can also indicate that the pipe itself has broken or is getting ready to break. If you notice that your toilets are draining slower than usual, it’s important to call a professional as soon as possible.

Another way to determine if the sewer line is damaged is by listening to it. If you hear strange sounds coming from your toilets, such as gurgling or a loud clanging noise, this is a sign that the sewage is flowing into the toilet rather than out of the pipe. This means that there is a clog in the line, and you should call a plumber as soon as possible.

If the sewage is allowed to flow into your yard, it can soak into the soil and soften it. This can lead to the ground cracking and shifting, which can put pressure on the sewer line itself. It can even cause the line to break or collapse entirely. If the line breaks, it can lead to a flooded yard and sewage backup in your home.

Eventually, the sewage will seep into the groundwater and cause contamination. This can be a serious health risk for you and your neighbors, as the untreated wastewater can contain bacteria that can cause various illnesses. To avoid this, you should always maintain your septic system and have it inspected regularly.

One of the biggest factors that affects the cost of a sewer repair is the amount of digging needed to access the pipes. Fortunately, most plumbing companies provide trenchless repair methods that can minimize this expense. However, if the line needs to be replaced altogether, it can be more expensive as it will require a crew of experts with excavation equipment.


The Benefits of Junk Removal

Junk Removal

Junk removal companies can reclaim spaces that are otherwise wasted on things like old furniture, broken appliances, and piles of shipping boxes. This makes getting around the house easier and freeing space for more important things.Junk Removal

If you haul junk yourself, it takes a lot of trips to and from the landfill. A good junk removal company can save you money on fuel costs. For professional help, visit https://www.sgtjunkit.com/louisville-junk-removal.

Junk removal services are the perfect solution for those who want to reclaim their home or business space. They can save homeowners from the hassle of removing large items themselves, which would be difficult for them to do on their own, and they can also avoid the risk of injury caused by lifting heavy objects. Moreover, junk removal professionals can take care of the entire process, from beginning to end, so that you don’t have to worry about anything.

If you’re thinking of starting a junk removal service, you should start by doing your homework. Find out who the major players are in your area, what their advertising strategies are, and who their clientele is. You can do this by searching via Google Ads, looking at their websites and social media pages, or simply asking around. Once you have a good understanding of your market, it’s time to get started on your own junk removal business plan!

It’s important to choose a unique name for your company and register it with your local government, as well as registering your business. This will ensure that you’re doing everything legally, and protects you in case something goes wrong. Additionally, you’ll need to get insurance policies that cover the basics, such as general liability, workers’ compensation, and commercial auto.

If you’re unsure about how much your junk removal service should cost, contact local companies for free project estimates. Remember to factor in the size of your space, type of junk, and any additional services you may require, such as disassembly of large furniture or appliances. Once you have all of this information, you’ll be able to create a solid pricing structure for your business. This will help you to attract more customers, and increase your profit margins.

Saves You Money

Junk removal companies specialize in disposing of large, bulky items that are too big for regular garbage trucks. They also help you reduce the amount of junk you have by selling, donating, or recycling your unwanted items. This saves you money on trash disposal and frees up storage space for valuable possessions.

You can find junk removal services online or by referral from friends and family. It’s important to check whether a company is licensed, insured, and bonded. Some shady junk removal companies may steal your belongings or not dispose of them properly, so you need to protect yourself by only hiring legitimate companies.

Before launching your junk removal business, you should register it with the appropriate authorities. You can do this by searching the local government’s website for information on registration requirements. You will need to provide your name, address, and contact number to register your business. Also, you should open a bank account for your junk removal business to keep track of all your finances. This will be helpful when filing taxes and other business-related documents.

Another important step in starting a junk removal business is to research your competition’s prices. Then, you can decide how much to charge for your service. Remember that your clients are not going to hire you if they can do it themselves for less money. You will need to attract them with quality service and a good reputation.

In addition to the initial startup costs, you will need to buy junk removal equipment and supplies. This includes a truck, trailer, and dumpsters. It’s also a good idea to invest in some marketing and advertising materials, such as fliers and signage. You should also get a vehicle wrap with your business name and phone number to increase visibility.

Most junk removal companies charge by volume, so be sure to group items together before the company arrives. You can also save time and money by disassembling large items, such as furniture, to make them lighter. It will be easier for the junk removal team to haul away the items, which will save you money on the cost of removal.

Saves You Energy

Junk removal is an eco-friendly option for a number of reasons. Professional junk haulers recycle as much of your unwanted items as possible, ensuring that it doesn’t end up in landfills. They also make sure that any hazardous materials are disposed of properly to avoid environmental harm. These services are ideal for residential and commercial properties that want to declutter, improve safety, optimize space, and increase property value.

The best way to find a junk removal company that suits your needs is by asking questions. Look for one that is licensed and insured to protect you from scams and damage caused by unlicensed workers. In addition, ask about pricing structure. Many companies require an on-site inspection before they provide a quote, but some offer online price estimators to help you budget. Also, ask about their policies on reusable materials and recycling, as well as what types of items they cannot accept.

Clutter can rob you of energy, especially if it is in your workspace or living areas. A clean, clutter-free environment can bring more energy into your life and increase productivity. However, dealing with junk can be a time-consuming and tedious process. Hiring a junk removal service can save you valuable time and energy that you can spend on more important things in your life.

While it is true that junk removal can be an expensive service, the amount of money you can save by not having to deal with your own trash can be considerable. When you consider that a typical garbage disposal service requires you to fill a large bin for pickup every week, you can see how much money you can save by contacting junk removal services.

When you dispose of your own junk, it takes a lot of fuel to drive your vehicle to the landfill or recycling center. When you hire a junk removal service, they can use the same truck to pick up trash from multiple homes, reducing the need for individual vehicles and saving fuel.

Most junk removal companies are environmentally conscious, so you can be sure that your trash will be disposed of correctly. They also have a team that sorts through the junk they pick up, pulling out any items that can be recycled or reused in some fashion. This helps to reduce waste in landfills and prevents plastics from polluting the ocean.

Saves You Space

Junk removal services are a valuable resource for anyone who needs to clear out their home or office. Whether you’re moving or simply need to declutter, junk removal services can help you get rid of everything from large furniture to yard waste and electronics. These companies provide a full-service junk pickup experience that saves you time and money by handling all of the heavy lifting for you. They’ll even make sure that your junk is properly disposed of so that it doesn’t end up in landfills or harming the environment.

Junk is not only unsightly, but it can also be dangerous. Cluttered hallways can pose a trip or fall hazard, while unorganized office spaces can inhibit productivity. It’s important to clean up messes and declutter on a regular basis to keep your space safe and organized. Junk removal can be a great way to take care of larger piles of clutter or unwanted items that you don’t have the time or energy to deal with on your own.

Most junk removal companies have a set disposal process for the items they haul away, and they’ll usually separate out any items that can be recycled or donated. This is a much better alternative to simply throwing everything in the trash, as it reduces waste and helps those in need. Many people find it easier to let go of their unwanted items when they know that someone else will benefit from them.

When you’re ready to hire a junk removal service, choosing a reputable and experienced company is important. Look for a company that has good reviews and ratings from past customers. You can also ask friends and family members for recommendations. Once you find a junk removal service that you trust, they’ll be able to help you save time, energy, and money while improving the look and feel of your space. With so many benefits, it’s no wonder more and more people are turning to junk removal services every day!

Why Air Conditioning Repair Is Necessary

hvac

During hot weather, air conditioning technicians often charge emergency fees. This ensures they can service a home’s AC unit promptly. Many problems can be prevented by keeping up with maintenance appointments. This will save you repair costs and replacement expenses. Here are a few common reasons you might need air conditioning repair: clogged filters, leaking evaporator coils, or inefficient cooling cycles. Contact Comfort Pro’s Heat And Air professionals for appointments today.hvac

Dirty Evaporator Coil: The evaporator coil of your air conditioning system is a vital part of the cooling process. It absorbs heat from the circulating air in your home and transfers it to another location, but it can suffer from a host of issues when routine AC maintenance is overlooked.

Dirty evaporator coils can be relatively easy to miss, especially since they often do not show any obvious signs or symptoms until the AC is working harder than normal to meet your cooling demands. However, if you do pay attention to your bills, you may be able to catch this problem early on, which can save you money in the long run.

A dirty evaporator coil will reduce the efficiency of your air conditioner, and it can even result in a buildup of frost. The ice can block the transfer of heat and stop the evaporator coil from functioning. If you do notice that the evaporator coil is covered in frost, turn off the air conditioning and call for an AC repair service immediately.

In addition, a dirty evaporator coil can increase the amount of moisture in the air. This can lead to mold and mildew, which will damage your AC unit and cause the evaporator coil to break down.

You can prevent dirt and debris from getting into the evaporator coil by cleaning it regularly with an air hose. You should also trim the surrounding shrubs and foliage to allow adequate airflow. In addition, it is a good idea to periodically “comb” the aluminum fins with a metal comb to keep them from becoming bent, which can impede airflow and slow the rate at which heat is absorbed.

Dirty Compressor Coil: The evaporator coil absorbs heat from the air that blows through your home to cool it, while the condenser coil releases absorbed heat back into the outdoors. Both coils need to be free of dirt and debris buildup to function properly.

Dirty evaporator coils can cause your system to overwork, causing increased energy bills, wear-and-tear on other AC parts, and a shortening of the unit’s lifespan. You may also notice that your home isn’t as cool as it used to be if the coils are dirty.

A dirty compressor coil is another major reason to call an HVAC professional for AC maintenance. Both coils need to be clean for your system to run efficiently, but the evaporator coil is especially important since it’s where heat is absorbed from the air.

Your dealer will carefully remove the outer casing and top of your air conditioner to expose the evaporator coils. If necessary, he or she will use a shop vac to remove loose dirt and debris from the surface of the coils. He or she will then use a fin-straightening tool to straighten any bent coil fins.

Once the coils are clean, your dealer will use a special coating to ensure that any remaining dust and debris doesn’t return to the coils in the future. He or she will also inspect the entire unit to make sure that it’s operating properly, including ensuring that it’s in a well-ventilated area and has adequate space around it. This is particularly important as some plants, bushes, or debris can block the airflow to and from the unit. Contact your local HVAC dealer if you’re interested in having your evaporator and condenser coils cleaned or for more information about AC maintenance services.

Low Coolant Levels: Most gas, diesel, and hybrid engines generate a significant amount of heat when in operation. A portion of this is channeled into the air conditioner to cool your car, while the remainder must be managed in some other way or your engine will overheat and stop working. The cooling system is responsible for keeping the temperature under control, and one of its essential components is coolant. If your coolant levels are low, it will not be able to transfer as much heat from the engine, and you may notice the temperature gauge in the instrument cluster rising higher than normal.

Coolant is a clear liquid, so it’s easy to tell when the level is dropping. However, it can be hard to determine the correct level of coolant in your vehicle, especially if you have an older model. Some vehicles have a coolant level sensor that will warn you when the fluid is getting low, but not all do. The best way to check the coolant level is to open the hood and look in the reservoir.

In addition to affecting the cooling of your engine, low coolant levels can affect your AC system. A low coolant level means there will not be enough refrigerant to absorb as much heat from the compressor during each cooling cycle, so it will run longer and not be as effective. This can also cause the evaporator coil to become frosty and have to be replaced. Make sure to always use a certified air conditioning repair professional to work with refrigerants, as these chemicals are ozone-depleting and require special care when handling. The right professional will be able to recharge the air conditioning system with the proper amount of coolant, and they will inspect the system for any other issues as well.

Faulty Thermostat: One of the most common problems with air conditioning is a faulty thermostat. This can lead to the system constantly running and not cooling. You can do a few things to prevent this from happening. First, make sure the batteries are not dead. You can also check to see if the settings are correct. Lastly, clean the thermostat. This can help prevent dirt and dust from building up. If you still have no luck, call in a professional. A professional will have the tools and knowledge to diagnose and fix the problem quickly.

Another sign that your thermostat is faulty is that it isn’t turning off when the room temperature reaches the set point. A new thermostat can fix this by sending the correct signals to your air conditioner.

A dirty thermostat can also cause issues with your air conditioner. When a thermostat becomes dirty, it can’t sense the actual temperature of the room. This leads to it cycling on and off. Oftentimes, this cycle can cause the system to overheat and damage other components.

You can prevent your thermostat from becoming dirty by cleaning it regularly. You can use canned air or a soft artist brush to remove dust from the cover. You should also change the batteries in your thermostat regularly. This is a simple task that can take just minutes. Doing this on a routine basis will help you avoid a battery failure. It’s also a good idea to have a technician test the wiring connections on your thermostat regularly. This can catch problems early and prevent expensive repairs. It’s always best to hire a professional because they have the tools and knowledge necessary to repair your thermostat quickly and effectively.

Warm Air: If your AC is blowing warm air it means the system has a refrigerant leak or it’s simply worn out. This is a serious problem that requires immediate attention. A professional can repair or replace the compressor, evaporator coil, or condenser coil to solve this issue. Depending on the cause of the refrigerant leak, the technician may be able to repair it and recharge your system with a new Freon.

Another reason your AC may be blowing warm air is that the ductwork is damaged or clogged. A professional can inspect and clean the ductwork to remove any debris or obstructions that are preventing cool air from entering your home.

Your thermostat may be set to ON instead of COOL, or it’s been bumped or changed by someone else. This can cause your air conditioner to run constantly, even if it’s not cooling the house. Make sure the thermostat is set to COOL and that the fan settings are set to AUTO.

Older systems rely on the refrigerant Freon, which is now a banned chemical that depletes protective ozone in the atmosphere. These chemicals are being phased out and replaced with HCFCs that are less harmful to the environment. If your air conditioning system is older than 10 years or if it needs frequent repairs, you should consider replacing it with an energy-efficient model.

The best way to keep your air conditioner in tip-top shape is to have it serviced once a year by a certified professional. Having a well-maintained AC unit will extend its lifespan and help you avoid costly air conditioning repairs in the future.


What Is Disaster Restoration?

Disaster Restoration

Restore Draper helps homeowners restore their homes after a natural or man-made disaster. Often, they can save money by cleaning, repairing, and restoring items rather than replacing them. They can also save valuable sentimental items, such as family heirlooms.Disaster Restoration

During mitigation, professionals block off areas with containment poles to keep contamination contained and safe. They protect surfaces with Trimaco’s heavy-duty surface protectors.

Remediation is the process of identifying and correcting an issue. In disaster restoration, remediation may involve cleaning up hazardous materials, repairing damaged buildings or roads, and restoring power and communications services. Remediation may also be used to describe the process of teaching students who are behind grade level in their academic subjects. Remediation classes help them catch up by providing extra support and instruction.

The disaster restoration industry is expected to grow at a significant rate in the next few years. This is due to the increasing number of natural disasters, such as floods, fires, wind storms, and heavy rain. The industry is characterized by the use of advanced tools and equipment and highly trained professionals. It is also characterized by the use of specialized training to prevent and mitigate the effects of a disaster.

Disasters can be devastating and cause massive damage to properties. The restoration of such damages is a difficult task and requires a lot of time, effort, and money. Disaster restoration professionals are skilled in assessing the damage and determining the best course of action to take. They use a wide range of methods and techniques to restore the property to its pre-disaster condition.

Whether you’re cleaning up after a flood, dealing with mold growth, or scrubbing up spilled chemicals, you need to protect yourself and your workers. Wearing personal protective equipment (PPE) is the most effective way to minimize risks, especially when working in confined spaces or tight areas. Protective gear includes gloves, eyewear, and a face mask. PPE can be purchased from many retailers, including hardware stores and home improvement centers.

Unlike mitigation, which reduces the impact of a disaster, remediation is a proactive measure taken to prevent damage from occurring in the first place. For example, if you live in an area prone to flooding, you might build levees or sea walls to prevent water from entering your house. Remediation can also include reducing the risk of erosion by removing sediment from rivers and streams. Remediation can be a cost-effective way to improve the environment and protect your property.

Cleaning

Cleaning can include the removal of dust, smears, and other contaminants from surfaces, as well as deodorizing and restoring items that have been damaged by smoke or fire. It often requires specialized products and equipment to clean contaminated surfaces and restore personal belongings. It also requires an eye for detail to bring intricate home details back to life.

Disaster restoration businesses can reduce the risk of injury by waiting to return to a job site until they are given clearance to do so. Local authorities, emergency responders, and stabilization organizations will inform them when it is safe to reenter the area.

Repairs

Repairs are the steps that go beyond cleaning and help restore a home or business to the condition it was in before a disaster occurred. This involves fixing damage, repairing water or fire damage, and replacing or restoring items like carpeting, furniture, cabinetry, draperies, appliances, and even sentimental items such as family heirlooms. Disaster restoration professionals also perform mold and mildew control as well as asbestos testing in order to prevent harmful contaminants from contaminating the property further.

Repairing after a natural disaster can be an overwhelming task. There may be multiple damaged buildings, washed-away roads and bridges, downed power lines, and hazardous materials scattered throughout the area. The first thing that needs to be done is secure the site. This includes examining the damage for safety and inventory purposes, which could include taking note of any fallen debris or equipment that may pose an immediate danger.

This step also involves ensuring that the proper procedures are followed in order to file an insurance claim. Disaster restoration service providers are familiar with the insurance industry and can work directly with your provider in order to ensure that all paperwork is completed properly. This allows for a quicker approval of your insurance claim and can save you the headache of figuring out how to cover the cost of the repairs on your own.

The COVID-19 outbreak had a significant impact on many industries around the world, but disaster restoration services have managed to weather the storm quite well. With the resumption of normal operations, businesses are starting to see an increase in demand for their services again. With the right training and the necessary tools, restoration service companies are continuing to provide high-quality work that helps rebuild communities. Some of the major players in this field are BMS Enterprises, Steamatic, Paul Davis Restoration, GDI Integrated Facility Services, Duraclean, Servpro, and Neighborly. These companies are offering the same level of service and care that they always have, regardless of the state of the economy or the outbreak of COVID-19. This is what makes them stand out from other competitors and will continue to drive their growth in the years to come.

Rebuilding

Disasters are often catalysts for change. The rebuilding and renewal process can be an opportunity to build more resilient and prepared communities for the future. It also presents the chance to rethink and improve upon the infrastructure that was previously in place.

Rebuilding is a complex and often grueling task that can take years to complete. In order to make the most of this opportunity, it is important to plan ahead and have a clear understanding of what is involved. This can help to ensure that the rebuild is up to code and meets the highest construction standards. It is also important to work with a professional contractor who can help navigate the sometimes complicated and overwhelming process of rebuilding.

A disaster restoration project is often a large undertaking and requires the assistance of many different agencies, stakeholders, and experts. This can cause delays and even setbacks, but a team that is dedicated to getting the job done will be able to overcome these challenges. To achieve this, it is crucial to have a clear and consistent communication channel. This can help identify any potential problems before they arise and keep everyone on track.

The rebuilding process after a natural disaster can be challenging, and it is essential to consider the long-term impact of any decisions that are made. This can help ensure that the rebuilding is not only cost-effective but also environmentally friendly and sustainable. In addition, it is important to involve the community in the rebuilding process. This can be achieved through community meetings, workshops, and participatory decision-making processes. This will help to build a sense of ownership and accountability and to develop solutions that are more likely to meet the community’s future needs.

Whether you are dealing with flood damage, hurricane damage, or any other type of natural disaster, it is vital to act quickly. By implementing these steps, you can restore your property and your life as soon as possible. By working with a professional, you can ensure that the rebuilding and repair process is completed in an efficient and effective manner.

How to Mount a TV to a Wall

tv mounting

When properly installed, TV Mounting on a wall can be a great addition to any room. It can also be a safety hazard if not secured to the wall or studs.tv mounting

Use a stud finder to locate the studs on the wall where you want to mount your TV. Then mark the location of each stud.

Whether you’re upgrading to a bigger TV or simply want to free up space in your entertainment center, wall-mounting your television is a simple DIY project that can save you money and headaches. However, it’s important to understand the process before you begin in order to avoid mistakes that can leave your TV crooked on the wall or even hanging off the wall completely.

First, you’ll need to select the right mount for your set. This comes down to two main things: what size of TV the mount can accommodate and where you plan on mounting it. Most of the selections on our best TV mounts list will work with most modern sets, but you should check your specific set’s model and dimensions before you buy anything.

Once you’ve chosen a mount, you’ll need to make sure that the template provided with your mount will fit over the studs in your wall. The easiest way to do this is to tape up the mount template, then use a level to line it up horizontally and vertically (the location of the studs will dictate where you can place your TV, so make sure you know that before you start drilling holes).

If you don’t have a level, you can also try using a pencil to mark the locations where the studs should go on the wall. Then, drill the pilot holes, which are just big enough for your mounting screws to fit through. You’ll need a carbide-tipped masonry bit for this and a standard Phillips-head drill bit for driving the mounting screws.

Next, you’ll need to hold the mount up to the wall and use a level to make sure that it is level. If it’s not, you may need to use a screwdriver to loosen the screws in the mount template and move it until it is. Be sure to tighten the screws firmly once everything is in place. You’ll also need a carpenter’s level for final checks before you’re finished. This will keep you from ending up with a crooked TV that’ll leave you wondering where the problem is.

Choosing a Mount

There are a lot of different TV wall mounts available. Narrow down the options by determining your own viewing needs and the room in which you intend to mount the TV. To start, decide whether you want your TV to have a fixed or moving position. Once you have done this, you can narrow down the choices by evaluating features like the ability to swivel or tilt the TV and wire management options.

Then, be sure the mount is rated for the weight of your TV. All major brands will list the suggested weight limits for their mounts. Sticking to these restrictions will prevent your mount from sagging under the weight of a heavy TV or, worse yet, failing mechanically and causing damage or injury.

Another consideration is the mounting location and height. Make sure the mount can withstand the weight of your TV and any other equipment you plan to install (like sound systems or video game consoles). You may also need to install an electrical outlet where the wall mount will be mounted. It is a good idea to consult an electrician before beginning any electrical work.

Once you have settled on the location, use a stud finder to determine if there are studs in the wall where you plan to mount your TV. If there aren’t studs, it will be difficult to secure your mount and could lead to structural damage.

Next, choose a mount with a VESA pattern that matches your TV. This will ensure that the mount can support your TV’s screen size and type. Look for this information in the TV’s manual or on its manufacturer’s website.

Finally, consider the type of movement you want your TV to have. You might need a flat mount for a fixed position or a swivel or tilting mount for a more adjustable position. Finally, evaluate the wire management options offered by each mount to determine which one will work best for you. There is nothing that will detract from the look of your new TV installation faster than loose wires hanging down from the mount. Look for mounts that offer channels or clips in the body of the unit to keep wires neat and tidy.

Preparing the Wall

If you want to mount your TV to a wall, it’s a good idea to start with some planning. This can help ensure that the project is successful and also minimize the possibility of crooked or uneven mounting, which can detract from your viewing pleasure.

First, decide where you want to mount the TV and select an appropriate location. Be sure that you choose a spot that allows for comfortable seating and consider the optimum viewing angle and height for your TV (see our guide on the Best Place to Mount a Television for more tips).

Next, determine what type of wall you have. Drywall is the most common wall material, and fortunately, most mounts are designed to work with it. However, to support the weight of the TV and the mount itself, it’s important that your wall have studs (vertical pieces of wood) behind it. These will provide a strong anchor point, and they’ll keep your mount from falling off the wall.

If your home is an older type of building, it may have solid brick walls or concrete breeze blocks. These require special care and extra fixings, so it’s best to consult an expert before attempting to mount a TV on them. Newer homes and some conversions are often constructed from timber frames or plasterboard. Using these types of walls can be tricky as they don’t have the same structural integrity as a stud wall.

Once you’ve determined the type of wall, it’s time to prepare it for the mounting process. Begin by removing any electrical outlets or junction boxes from the area where you plan to mount the TV, and use a stud finder to locate studs in the wall. Be sure to mark the stud locations with a pencil so that you know where to drill your pilot holes for the mounting screws later.

If you don’t have a stud finder, remove the cover from an outlet or junction box and poke around with your finger to feel for any hollow spots. You can also use a screwdriver to test the wall by driving a screw into it. If it holds the screw securely, then you have a solid surface for your TV mount.

Mounting the TV

A mounted TV brings a sense of style to the room and elevates the viewing experience for everyone watching. It can also increase the amount of usable space in a room and help avoid the annoyance of wires running across the floor.

Before you do anything, make sure to turn off any circuit breakers in the area where you plan to mount the TV. You’ll also want to have a partner to help with this project and ensure that all measurements are accurate. You’ll need a stud finder, a power drill, and tools like a tape measure, screwdriver, and level to complete this project successfully.

Begin by locating the wall studs where you want to mount the TV. A stud finder is the easiest way to do this. Once you’ve found the stud locations, mark them on the wall with a piece of tape.

Most TV wall mounts come with a mounting template to help you determine where the screw holes will go on the back of your TV. The mounting template may include multiple hole options to compensate for the location of the studs on your wall. If not, you can usually use a ruler to estimate the position of the mounting holes.

The next step is to attach the mounting bracket to the back of your TV. The bracket will have screw holes that line up with four of the holes on the back of your TV. It is important to be aware of how far apart the studs are in your wall when mounting a TV, so you can purchase a mount that fits the distance between each stud.

Hollow-wall drywall mount installations can be limited to total weights (TV, mount, and all accessories) of 100 pounds or less. For a safe installation, use toggle bolts instead of regular screws on these installations.

If you have a smart TV, the height of the wall mount may impact the quality of the WiFi signal. It’s worth experimenting with different positions to see what works best for your home. Also, consider any other obstacles that could get in the way of a clear signal, such as nearby chimneys or large furniture pieces.