How a Log Home Professional Can Protect Your Investment

Richardson Log Homes LLC can help you keep your logs looking their best and protect your investment for the long term. They will have experience with the special needs of log homes and can provide a cost analysis for your project. The most common reason for rot and insect damage to log homes is due to homeowners not following the recommended maintenance instructions for their stain and finish. This is an easy problem to avoid with regular maintenance.

Staining

log home restoration

Stains do more than make log homes look beautiful – they provide a layer of protection for the wood. This protects it from dirt, water and chips. It also helps block UV rays that can damage the wood and cause mildew or rot. Stains are available in a wide variety of colors and finishes. They can be applied to bare wood or over an existing coat of stain, although the surface must be prepped properly for best results.

Ideally, staining should be done when the weather is clear and dry. This will allow the first coat to penetrate and adhere to the wood. After the stain dries, it should be back brushed to help it look even and prevent streaking. The next coat is then applied and allowed to dry. Repeating this process of sanding and applying stain allows you to get the most longevity from your log home stain.

It is important to inspect your cabin regularly and re-stain it every 4 to 6 years depending on your climate and exposure. If your cabin has large cracks or checks (checking is normal for old wood) these should be caulked. This will prevent rain from soaking into the wood, causing mold, mildew and/or rotting. It is also critical to look closely at the areas around doors and windows as they are more prone to leaks.

When selecting a stain for your cabin it is important to choose a product designed specifically for log and timber homes. These products are formulated with the highest quality ingredients to improve the water repellency of the wood. They will also offer the longevity needed to help protect your investment well into the future.

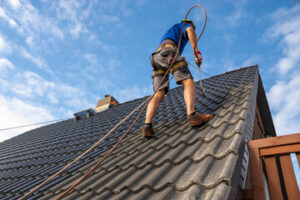
Staining is a time consuming project and requires careful prep work. If the surface is not prepped properly, none of the products on the market will perform as promised. The prep process starts by washing the logs or wood to remove any dirt, dust or debris that may be present. This is followed by sanding the logs or wood with a random orbit sander to smooth the surface and prepare it for re-staining.

Chinking

One of the most important things you can do for your log home is chinking. Chinking is the seal that prevents moisture, wind and insects from entering your home. It also keeps your logs from rot. It is not only functional but it adds to the character of your cabin. There are many different types of chinking on the market today but the best type for your log home is Triple Stretch. This chinking is available in a wide variety of mortar colors to match your logs or create a contrast that highlights the uniqueness of your log home.

Chinking is done in a similar way as caulking but there are a few differences. First, you will need to clean the logs. This can be a very tedious task but it is necessary to ensure that your chinking adheres properly. It is best to do this in the spring when your logs are clean and dry.

Next, you will need to use a backer rod or make your own. This is a rod that is inserted into the lower logs to create a barrier. It helps keep the chinking from sticking to the lower logs and allows it to adhere to the top. It is best to do this with galvanized nails and to nail it in every 2-3 inches.

Once you have completed the backer rod you will need to install your chinking. There are a few different methods to do this and none are better than the others, it just depends on your comfort level. Regardless of which method you choose to use, make sure that the chinking is installed evenly. You want to make sure that it is completely filled and no gaps are left.

While chinking isn’t as easy as staining your log home it is an important step that can be accomplished by most people. However, if you are uncomfortable with this type of work or do not have the proper equipment it may be best to hire a professional. They will have the tools and experience to complete this important task in a timely manner and with excellent results.

Waterproofing

One of the most overlooked steps in the log home restoration process is waterproofing. This step protects the logs from moisture infiltration that can cause rot, mold and mildew. It also helps prevent UV breakdown of the wood, protecting it from the sun’s harmful rays. This step is a must for all log homes, but is particularly important in areas of the home where moisture can enter, such as gable dormers and chimneys.

Moisture is a log home’s biggest enemy. Log cabins are very porous and without proper protection, moisture can wreak havoc in many ways including:

Waterproofing the entire exterior of a log home is the best way to prevent moisture from penetrating the interior of a log cabin. This can be accomplished through various methods, but is most commonly achieved through chinking and caulking.

Proper waterproofing should be done by an expert, and should include all areas of the home, especially the underside of logs where moisture can easily accumulate. It is also important to make sure that all roof areas are properly flashed. In addition, gutters should be installed to direct rain away from the walls of the cabin.

Any staining or chinking should always be followed by a preservative that penetrates into the wood and makes it toxic to most wood-destroying insects. Some of the best preservatives for log homes are borates. They are very effective and relatively inexpensive. They are very useful for log homes in areas that have a lot of precipitation and humidity.

When a log home is restained and resealed, the new finish should be treated with a preservative that will protect it from mold and mildew, as well as insect damage. This should be applied in a timely fashion, as it is very difficult to remove fungus and insect infestation once they have penetrated into the wood.

It is also a good idea to apply an additional preservative to any area of the home that has bare wood showing. It is important to choose a preservative that takes a stain well, such as the Outlast Q8 Log Oil or Energy Seal.

Siding

If you’re going to hire someone to do the work on your log home, be sure they’re experienced and qualified. Look for references and photos of previous work they’ve done on log homes. They should also be able to explain the process and answer any questions you might have. If they can’t, move on to another company.

Log home builders have a passion for these unique one-of-a-kind homes and have dedicated themselves to mastering the techniques involved in building and restoring them. They’re often able to provide you with a detailed proposal that includes an estimate of the cost of each task and an overall estimate of the project completion date.

Using premium products, a skilled contractor can restore your log home to its original beauty and protect it against moisture damage. This can increase the life expectancy of your home by up to 300%.

To apply a stain or clear coat, the contractor will use hand or airless sprayers to ensure even coverage and smooth application. They will be sure the weather is dry before applying and will work in sections that can be quickly cleaned or rinsed. They may also chink and caulk in between the logs and trim as needed.

Wood siding is prone to many kinds of damage. Wind, rain, insects, and sun can all take a toll on it over time, making the logs loosen and warp. To keep your log home looking its best, it’s important to understand the different types of damage and know how to spot them.

Some signs of a problem with your logs are mold or mildew growth, blown in dirt and dust, and even deterioration of the wood. When a problem occurs, it’s essential to act quickly in order to prevent further damage and to save the rest of the home.

Some log home owners decide to do the work themselves rather than hiring a professional. While this may seem like a cheaper option, it’s often not worth the effort in the long run. Without the proper tools and knowledge, they’re likely to damage the logs, causing them to lose their structural integrity and value.

Signs That You Need Sewer Line Repair

plumbing

plumbingIf you experience clogged drains, you may need to schedule a sewer line repair. Your plumber will run a camera through your pipes to identify the problem and locate any cracks, holes, or collapsed sections of the pipe. There are several different methods for sewer line repair, including trenchless options. These methods minimize excavation and allow your plumbing professionals to complete the repair quickly. 

Corrosion is one of the leading causes of sewer line failure, and it can cause a lot of damage in a relatively short amount of time. It happens when metals like iron come into contact with water, creating a chemical reaction that slowly wears away at the pipe walls. This results in tiny holes that, over time, can grow into big leaks.

A corroded pipe can also allow waste to seep into your home, causing serious issues with your plumbing and your health. For example, lead and other toxic metals can leech into your drinking water if the pipes are corroded and leaking. This can cause a number of health problems, including anemia and liver damage.

Luckily, you can often prevent corrosion by using a water filter or installing a water softener. These devices can help to remove minerals that create buildup and sludge in your pipes, which can cause them to corrode faster than usual.

In addition, you can minimize your chances of corrosion by getting regular inspections of your sewer line from a licensed plumber. These inspections can catch small problems before they become bigger ones. During an inspection, your plumber will use a video camera to examine the length of your pipe, looking for cracks and other problems.

Once a problem is found, your plumber can recommend the best course of action. There are several ways to repair a sewer line, and the method chosen will impact the overall cost of the job. Traditional methods involve digging large trenches to find and replace the entire line, which can be expensive and disruptive to your landscaping and hardscaping. Trenchless repair options, on the other hand, can be much less invasive and save you money in the long run.

For instance, CIPP is a trenchless technique that involves inserting a flexible liner into your existing pipe and inflating it to seal any cracks or holes. This method can restore your pipe to almost new condition and costs $80 to $250 per foot. Another trenchless method, spin-casting, uses a resin that is sprayed inside your damaged pipe to strengthen it and prevent future leaks.

Tree Roots

Trees are lovely and add value to your property, but they can cause major problems with sewer lines. If a tree is too close to the line, its roots will grow into it and cause blockages. This can lead to slow drains, gurgling toilets, and other issues. A professional plumber will be able to diagnose the problem and fix it before it worsens.

A common sign that tree roots are causing damage to your sewer line is the presence of soft or soggy spots in your yard. These are caused by water that is leaking into the ground from a broken pipe, often near where the pipe connects to your house. You may also notice a foul smell coming from your drains. This is caused by the rotting of the inside of the pipe from the presence of tree roots.

When tree roots enter your sewer pipes, it is very difficult to remove them. The roots will always grow back unless they are cut or killed, and a professional plumber will be the best option for this. A plumber will be able to use a machine called a mechanical auger to break up and cut the roots, or they can use a chemical like copper sulfate to kill the roots. Once the roots are dead, a plumber will be able to install new pipe and seal the area where the old pipes were.

There are several ways to prevent tree root invasion of your sewer line, including working closely with a landscaper when planning new landscaping. Experts recommend planting trees far enough away from your sewer line so that their roots don’t grow into the pipe. They will also advise you to choose varieties that have less invasive root systems, such as fringe or amur maple trees.

If you suspect that tree roots are damaging your sewer line, call a plumber right away. A plumber will be able to assess the situation with a plumbing camera and repair any damaged areas of the line. The most severe damage will require digging up and replacing the entire line, but even relining or replacing sections of the line can help to protect your home from costly root damage in the future.

Sewage Smells

The sewer smell that reminds us of rotten eggs is hydrogen sulfide, and it can be a sign of serious plumbing problems. This unpleasant odor is caused by rotting waste, and it can enter your home through pipes that are broken, cracked, or clogged. Whether the problem is a faulty seal or a major pipe leak, it needs to be addressed as soon as possible.

Hydrogen sulfide is a colorless gas that can kill people and pets, so it’s important to stay away from the area until the plumber arrives. If you can’t get away from the odor, open all the windows in your house to let it escape. If the odor is coming from the basement, try running water in the bathtub or shower to flush out any residue that might be blocking the sewer vents.

Some sewer line problems can be easily fixed by a DIYer, such as a missing wax ring that allows sewage gas to seep into the home. If the toilet is leaking around the flange, you can replace the wax ring to create a tight seal and block the smell.

However, many other issues require the expertise of a professional plumber to solve. A damaged sewage line can result in mold and mildew, which are both hazardous to your family’s health. These substances can damage the foundation, walls, and ceilings of your home.

Regular preventative maintenance is one of the best ways to keep your plumbing system functioning properly. A plumber can perform a yearly inspection of your drains to reduce buildup and detect any issues before they become major problems. By taking these measures, you can minimize your need for sewer repair. However, even the most preventative plumbing system can suffer a problem at any time. When you notice a foul odor, it’s crucial to call a plumber as quickly as possible. If you wait, the problem will likely worsen. This could lead to a sewage backup, which is much more difficult and costly to fix than it would be with early intervention. A plumber can also help you set up a preventative plumbing maintenance schedule to reduce the need for repairs in the future.

Mushy Yards

Having a muddy yard can be a real pain for homeowners. Not only does it look messy, but it also makes it difficult for family and friends to enjoy the outdoors. Luckily, there are many solutions for tackling this problem. One of the most common causes of a wet yard is a broken sewer line. If the line breaks, it can cause sewage to back up into your home. To avoid this, you should always pay attention to the following signs that your sewer lines aren’t working properly.

The first sign of a failing sewer line is slow draining. While it’s possible that this is caused by a minor clog, it can also indicate that the pipe itself has broken or is getting ready to break. If you notice that your toilets are draining slower than usual, it’s important to call a professional as soon as possible.

Another way to determine if the sewer line is damaged is by listening to it. If you hear strange sounds coming from your toilets, such as gurgling or a loud clanging noise, this is a sign that the sewage is flowing into the toilet rather than out of the pipe. This means that there is a clog in the line, and you should call a plumber as soon as possible.

If the sewage is allowed to flow into your yard, it can soak into the soil and soften it. This can lead to the ground cracking and shifting, which can put pressure on the sewer line itself. It can even cause the line to break or collapse entirely. If the line breaks, it can lead to a flooded yard and sewage backup in your home.

Eventually, the sewage will seep into the groundwater and cause contamination. This can be a serious health risk for you and your neighbors, as the untreated wastewater can contain bacteria that can cause various illnesses. To avoid this, you should always maintain your septic system and have it inspected regularly.

One of the biggest factors that affects the cost of a sewer repair is the amount of digging needed to access the pipes. Fortunately, most plumbing companies provide trenchless repair methods that can minimize this expense. However, if the line needs to be replaced altogether, it can be more expensive as it will require a crew of experts with excavation equipment.


The Benefits of Junk Removal

Junk Removal

Junk removal companies can reclaim spaces that are otherwise wasted on things like old furniture, broken appliances, and piles of shipping boxes. This makes getting around the house easier and freeing space for more important things.Junk Removal

If you haul junk yourself, it takes a lot of trips to and from the landfill. A good junk removal company can save you money on fuel costs. For professional help, visit https://www.sgtjunkit.com/louisville-junk-removal.

Junk removal services are the perfect solution for those who want to reclaim their home or business space. They can save homeowners from the hassle of removing large items themselves, which would be difficult for them to do on their own, and they can also avoid the risk of injury caused by lifting heavy objects. Moreover, junk removal professionals can take care of the entire process, from beginning to end, so that you don’t have to worry about anything.

If you’re thinking of starting a junk removal service, you should start by doing your homework. Find out who the major players are in your area, what their advertising strategies are, and who their clientele is. You can do this by searching via Google Ads, looking at their websites and social media pages, or simply asking around. Once you have a good understanding of your market, it’s time to get started on your own junk removal business plan!

It’s important to choose a unique name for your company and register it with your local government, as well as registering your business. This will ensure that you’re doing everything legally, and protects you in case something goes wrong. Additionally, you’ll need to get insurance policies that cover the basics, such as general liability, workers’ compensation, and commercial auto.

If you’re unsure about how much your junk removal service should cost, contact local companies for free project estimates. Remember to factor in the size of your space, type of junk, and any additional services you may require, such as disassembly of large furniture or appliances. Once you have all of this information, you’ll be able to create a solid pricing structure for your business. This will help you to attract more customers, and increase your profit margins.

Saves You Money

Junk removal companies specialize in disposing of large, bulky items that are too big for regular garbage trucks. They also help you reduce the amount of junk you have by selling, donating, or recycling your unwanted items. This saves you money on trash disposal and frees up storage space for valuable possessions.

You can find junk removal services online or by referral from friends and family. It’s important to check whether a company is licensed, insured, and bonded. Some shady junk removal companies may steal your belongings or not dispose of them properly, so you need to protect yourself by only hiring legitimate companies.

Before launching your junk removal business, you should register it with the appropriate authorities. You can do this by searching the local government’s website for information on registration requirements. You will need to provide your name, address, and contact number to register your business. Also, you should open a bank account for your junk removal business to keep track of all your finances. This will be helpful when filing taxes and other business-related documents.

Another important step in starting a junk removal business is to research your competition’s prices. Then, you can decide how much to charge for your service. Remember that your clients are not going to hire you if they can do it themselves for less money. You will need to attract them with quality service and a good reputation.

In addition to the initial startup costs, you will need to buy junk removal equipment and supplies. This includes a truck, trailer, and dumpsters. It’s also a good idea to invest in some marketing and advertising materials, such as fliers and signage. You should also get a vehicle wrap with your business name and phone number to increase visibility.

Most junk removal companies charge by volume, so be sure to group items together before the company arrives. You can also save time and money by disassembling large items, such as furniture, to make them lighter. It will be easier for the junk removal team to haul away the items, which will save you money on the cost of removal.

Saves You Energy

Junk removal is an eco-friendly option for a number of reasons. Professional junk haulers recycle as much of your unwanted items as possible, ensuring that it doesn’t end up in landfills. They also make sure that any hazardous materials are disposed of properly to avoid environmental harm. These services are ideal for residential and commercial properties that want to declutter, improve safety, optimize space, and increase property value.

The best way to find a junk removal company that suits your needs is by asking questions. Look for one that is licensed and insured to protect you from scams and damage caused by unlicensed workers. In addition, ask about pricing structure. Many companies require an on-site inspection before they provide a quote, but some offer online price estimators to help you budget. Also, ask about their policies on reusable materials and recycling, as well as what types of items they cannot accept.

Clutter can rob you of energy, especially if it is in your workspace or living areas. A clean, clutter-free environment can bring more energy into your life and increase productivity. However, dealing with junk can be a time-consuming and tedious process. Hiring a junk removal service can save you valuable time and energy that you can spend on more important things in your life.

While it is true that junk removal can be an expensive service, the amount of money you can save by not having to deal with your own trash can be considerable. When you consider that a typical garbage disposal service requires you to fill a large bin for pickup every week, you can see how much money you can save by contacting junk removal services.

When you dispose of your own junk, it takes a lot of fuel to drive your vehicle to the landfill or recycling center. When you hire a junk removal service, they can use the same truck to pick up trash from multiple homes, reducing the need for individual vehicles and saving fuel.

Most junk removal companies are environmentally conscious, so you can be sure that your trash will be disposed of correctly. They also have a team that sorts through the junk they pick up, pulling out any items that can be recycled or reused in some fashion. This helps to reduce waste in landfills and prevents plastics from polluting the ocean.

Saves You Space

Junk removal services are a valuable resource for anyone who needs to clear out their home or office. Whether you’re moving or simply need to declutter, junk removal services can help you get rid of everything from large furniture to yard waste and electronics. These companies provide a full-service junk pickup experience that saves you time and money by handling all of the heavy lifting for you. They’ll even make sure that your junk is properly disposed of so that it doesn’t end up in landfills or harming the environment.

Junk is not only unsightly, but it can also be dangerous. Cluttered hallways can pose a trip or fall hazard, while unorganized office spaces can inhibit productivity. It’s important to clean up messes and declutter on a regular basis to keep your space safe and organized. Junk removal can be a great way to take care of larger piles of clutter or unwanted items that you don’t have the time or energy to deal with on your own.

Most junk removal companies have a set disposal process for the items they haul away, and they’ll usually separate out any items that can be recycled or donated. This is a much better alternative to simply throwing everything in the trash, as it reduces waste and helps those in need. Many people find it easier to let go of their unwanted items when they know that someone else will benefit from them.

When you’re ready to hire a junk removal service, choosing a reputable and experienced company is important. Look for a company that has good reviews and ratings from past customers. You can also ask friends and family members for recommendations. Once you find a junk removal service that you trust, they’ll be able to help you save time, energy, and money while improving the look and feel of your space. With so many benefits, it’s no wonder more and more people are turning to junk removal services every day!

Why Air Conditioning Repair Is Necessary

hvac

During hot weather, air conditioning technicians often charge emergency fees. This ensures they can service a home’s AC unit promptly. Many problems can be prevented by keeping up with maintenance appointments. This will save you repair costs and replacement expenses. Here are a few common reasons you might need air conditioning repair: clogged filters, leaking evaporator coils, or inefficient cooling cycles. Contact Comfort Pro’s Heat And Air professionals for appointments today.hvac

Dirty Evaporator Coil: The evaporator coil of your air conditioning system is a vital part of the cooling process. It absorbs heat from the circulating air in your home and transfers it to another location, but it can suffer from a host of issues when routine AC maintenance is overlooked.

Dirty evaporator coils can be relatively easy to miss, especially since they often do not show any obvious signs or symptoms until the AC is working harder than normal to meet your cooling demands. However, if you do pay attention to your bills, you may be able to catch this problem early on, which can save you money in the long run.

A dirty evaporator coil will reduce the efficiency of your air conditioner, and it can even result in a buildup of frost. The ice can block the transfer of heat and stop the evaporator coil from functioning. If you do notice that the evaporator coil is covered in frost, turn off the air conditioning and call for an AC repair service immediately.

In addition, a dirty evaporator coil can increase the amount of moisture in the air. This can lead to mold and mildew, which will damage your AC unit and cause the evaporator coil to break down.

You can prevent dirt and debris from getting into the evaporator coil by cleaning it regularly with an air hose. You should also trim the surrounding shrubs and foliage to allow adequate airflow. In addition, it is a good idea to periodically “comb” the aluminum fins with a metal comb to keep them from becoming bent, which can impede airflow and slow the rate at which heat is absorbed.

Dirty Compressor Coil: The evaporator coil absorbs heat from the air that blows through your home to cool it, while the condenser coil releases absorbed heat back into the outdoors. Both coils need to be free of dirt and debris buildup to function properly.

Dirty evaporator coils can cause your system to overwork, causing increased energy bills, wear-and-tear on other AC parts, and a shortening of the unit’s lifespan. You may also notice that your home isn’t as cool as it used to be if the coils are dirty.

A dirty compressor coil is another major reason to call an HVAC professional for AC maintenance. Both coils need to be clean for your system to run efficiently, but the evaporator coil is especially important since it’s where heat is absorbed from the air.

Your dealer will carefully remove the outer casing and top of your air conditioner to expose the evaporator coils. If necessary, he or she will use a shop vac to remove loose dirt and debris from the surface of the coils. He or she will then use a fin-straightening tool to straighten any bent coil fins.

Once the coils are clean, your dealer will use a special coating to ensure that any remaining dust and debris doesn’t return to the coils in the future. He or she will also inspect the entire unit to make sure that it’s operating properly, including ensuring that it’s in a well-ventilated area and has adequate space around it. This is particularly important as some plants, bushes, or debris can block the airflow to and from the unit. Contact your local HVAC dealer if you’re interested in having your evaporator and condenser coils cleaned or for more information about AC maintenance services.

Low Coolant Levels: Most gas, diesel, and hybrid engines generate a significant amount of heat when in operation. A portion of this is channeled into the air conditioner to cool your car, while the remainder must be managed in some other way or your engine will overheat and stop working. The cooling system is responsible for keeping the temperature under control, and one of its essential components is coolant. If your coolant levels are low, it will not be able to transfer as much heat from the engine, and you may notice the temperature gauge in the instrument cluster rising higher than normal.

Coolant is a clear liquid, so it’s easy to tell when the level is dropping. However, it can be hard to determine the correct level of coolant in your vehicle, especially if you have an older model. Some vehicles have a coolant level sensor that will warn you when the fluid is getting low, but not all do. The best way to check the coolant level is to open the hood and look in the reservoir.

In addition to affecting the cooling of your engine, low coolant levels can affect your AC system. A low coolant level means there will not be enough refrigerant to absorb as much heat from the compressor during each cooling cycle, so it will run longer and not be as effective. This can also cause the evaporator coil to become frosty and have to be replaced. Make sure to always use a certified air conditioning repair professional to work with refrigerants, as these chemicals are ozone-depleting and require special care when handling. The right professional will be able to recharge the air conditioning system with the proper amount of coolant, and they will inspect the system for any other issues as well.

Faulty Thermostat: One of the most common problems with air conditioning is a faulty thermostat. This can lead to the system constantly running and not cooling. You can do a few things to prevent this from happening. First, make sure the batteries are not dead. You can also check to see if the settings are correct. Lastly, clean the thermostat. This can help prevent dirt and dust from building up. If you still have no luck, call in a professional. A professional will have the tools and knowledge to diagnose and fix the problem quickly.

Another sign that your thermostat is faulty is that it isn’t turning off when the room temperature reaches the set point. A new thermostat can fix this by sending the correct signals to your air conditioner.

A dirty thermostat can also cause issues with your air conditioner. When a thermostat becomes dirty, it can’t sense the actual temperature of the room. This leads to it cycling on and off. Oftentimes, this cycle can cause the system to overheat and damage other components.

You can prevent your thermostat from becoming dirty by cleaning it regularly. You can use canned air or a soft artist brush to remove dust from the cover. You should also change the batteries in your thermostat regularly. This is a simple task that can take just minutes. Doing this on a routine basis will help you avoid a battery failure. It’s also a good idea to have a technician test the wiring connections on your thermostat regularly. This can catch problems early and prevent expensive repairs. It’s always best to hire a professional because they have the tools and knowledge necessary to repair your thermostat quickly and effectively.

Warm Air: If your AC is blowing warm air it means the system has a refrigerant leak or it’s simply worn out. This is a serious problem that requires immediate attention. A professional can repair or replace the compressor, evaporator coil, or condenser coil to solve this issue. Depending on the cause of the refrigerant leak, the technician may be able to repair it and recharge your system with a new Freon.

Another reason your AC may be blowing warm air is that the ductwork is damaged or clogged. A professional can inspect and clean the ductwork to remove any debris or obstructions that are preventing cool air from entering your home.

Your thermostat may be set to ON instead of COOL, or it’s been bumped or changed by someone else. This can cause your air conditioner to run constantly, even if it’s not cooling the house. Make sure the thermostat is set to COOL and that the fan settings are set to AUTO.

Older systems rely on the refrigerant Freon, which is now a banned chemical that depletes protective ozone in the atmosphere. These chemicals are being phased out and replaced with HCFCs that are less harmful to the environment. If your air conditioning system is older than 10 years or if it needs frequent repairs, you should consider replacing it with an energy-efficient model.

The best way to keep your air conditioner in tip-top shape is to have it serviced once a year by a certified professional. Having a well-maintained AC unit will extend its lifespan and help you avoid costly air conditioning repairs in the future.


What Is Disaster Restoration?

Disaster Restoration

Restore Draper helps homeowners restore their homes after a natural or man-made disaster. Often, they can save money by cleaning, repairing, and restoring items rather than replacing them. They can also save valuable sentimental items, such as family heirlooms.Disaster Restoration

During mitigation, professionals block off areas with containment poles to keep contamination contained and safe. They protect surfaces with Trimaco’s heavy-duty surface protectors.

Remediation is the process of identifying and correcting an issue. In disaster restoration, remediation may involve cleaning up hazardous materials, repairing damaged buildings or roads, and restoring power and communications services. Remediation may also be used to describe the process of teaching students who are behind grade level in their academic subjects. Remediation classes help them catch up by providing extra support and instruction.

The disaster restoration industry is expected to grow at a significant rate in the next few years. This is due to the increasing number of natural disasters, such as floods, fires, wind storms, and heavy rain. The industry is characterized by the use of advanced tools and equipment and highly trained professionals. It is also characterized by the use of specialized training to prevent and mitigate the effects of a disaster.

Disasters can be devastating and cause massive damage to properties. The restoration of such damages is a difficult task and requires a lot of time, effort, and money. Disaster restoration professionals are skilled in assessing the damage and determining the best course of action to take. They use a wide range of methods and techniques to restore the property to its pre-disaster condition.

Whether you’re cleaning up after a flood, dealing with mold growth, or scrubbing up spilled chemicals, you need to protect yourself and your workers. Wearing personal protective equipment (PPE) is the most effective way to minimize risks, especially when working in confined spaces or tight areas. Protective gear includes gloves, eyewear, and a face mask. PPE can be purchased from many retailers, including hardware stores and home improvement centers.

Unlike mitigation, which reduces the impact of a disaster, remediation is a proactive measure taken to prevent damage from occurring in the first place. For example, if you live in an area prone to flooding, you might build levees or sea walls to prevent water from entering your house. Remediation can also include reducing the risk of erosion by removing sediment from rivers and streams. Remediation can be a cost-effective way to improve the environment and protect your property.

Cleaning

Cleaning can include the removal of dust, smears, and other contaminants from surfaces, as well as deodorizing and restoring items that have been damaged by smoke or fire. It often requires specialized products and equipment to clean contaminated surfaces and restore personal belongings. It also requires an eye for detail to bring intricate home details back to life.

Disaster restoration businesses can reduce the risk of injury by waiting to return to a job site until they are given clearance to do so. Local authorities, emergency responders, and stabilization organizations will inform them when it is safe to reenter the area.

Repairs

Repairs are the steps that go beyond cleaning and help restore a home or business to the condition it was in before a disaster occurred. This involves fixing damage, repairing water or fire damage, and replacing or restoring items like carpeting, furniture, cabinetry, draperies, appliances, and even sentimental items such as family heirlooms. Disaster restoration professionals also perform mold and mildew control as well as asbestos testing in order to prevent harmful contaminants from contaminating the property further.

Repairing after a natural disaster can be an overwhelming task. There may be multiple damaged buildings, washed-away roads and bridges, downed power lines, and hazardous materials scattered throughout the area. The first thing that needs to be done is secure the site. This includes examining the damage for safety and inventory purposes, which could include taking note of any fallen debris or equipment that may pose an immediate danger.

This step also involves ensuring that the proper procedures are followed in order to file an insurance claim. Disaster restoration service providers are familiar with the insurance industry and can work directly with your provider in order to ensure that all paperwork is completed properly. This allows for a quicker approval of your insurance claim and can save you the headache of figuring out how to cover the cost of the repairs on your own.

The COVID-19 outbreak had a significant impact on many industries around the world, but disaster restoration services have managed to weather the storm quite well. With the resumption of normal operations, businesses are starting to see an increase in demand for their services again. With the right training and the necessary tools, restoration service companies are continuing to provide high-quality work that helps rebuild communities. Some of the major players in this field are BMS Enterprises, Steamatic, Paul Davis Restoration, GDI Integrated Facility Services, Duraclean, Servpro, and Neighborly. These companies are offering the same level of service and care that they always have, regardless of the state of the economy or the outbreak of COVID-19. This is what makes them stand out from other competitors and will continue to drive their growth in the years to come.

Rebuilding

Disasters are often catalysts for change. The rebuilding and renewal process can be an opportunity to build more resilient and prepared communities for the future. It also presents the chance to rethink and improve upon the infrastructure that was previously in place.

Rebuilding is a complex and often grueling task that can take years to complete. In order to make the most of this opportunity, it is important to plan ahead and have a clear understanding of what is involved. This can help to ensure that the rebuild is up to code and meets the highest construction standards. It is also important to work with a professional contractor who can help navigate the sometimes complicated and overwhelming process of rebuilding.

A disaster restoration project is often a large undertaking and requires the assistance of many different agencies, stakeholders, and experts. This can cause delays and even setbacks, but a team that is dedicated to getting the job done will be able to overcome these challenges. To achieve this, it is crucial to have a clear and consistent communication channel. This can help identify any potential problems before they arise and keep everyone on track.

The rebuilding process after a natural disaster can be challenging, and it is essential to consider the long-term impact of any decisions that are made. This can help ensure that the rebuilding is not only cost-effective but also environmentally friendly and sustainable. In addition, it is important to involve the community in the rebuilding process. This can be achieved through community meetings, workshops, and participatory decision-making processes. This will help to build a sense of ownership and accountability and to develop solutions that are more likely to meet the community’s future needs.

Whether you are dealing with flood damage, hurricane damage, or any other type of natural disaster, it is vital to act quickly. By implementing these steps, you can restore your property and your life as soon as possible. By working with a professional, you can ensure that the rebuilding and repair process is completed in an efficient and effective manner.

How to Mount a TV to a Wall

tv mounting

When properly installed, TV Mounting on a wall can be a great addition to any room. It can also be a safety hazard if not secured to the wall or studs.tv mounting

Use a stud finder to locate the studs on the wall where you want to mount your TV. Then mark the location of each stud.

Whether you’re upgrading to a bigger TV or simply want to free up space in your entertainment center, wall-mounting your television is a simple DIY project that can save you money and headaches. However, it’s important to understand the process before you begin in order to avoid mistakes that can leave your TV crooked on the wall or even hanging off the wall completely.

First, you’ll need to select the right mount for your set. This comes down to two main things: what size of TV the mount can accommodate and where you plan on mounting it. Most of the selections on our best TV mounts list will work with most modern sets, but you should check your specific set’s model and dimensions before you buy anything.

Once you’ve chosen a mount, you’ll need to make sure that the template provided with your mount will fit over the studs in your wall. The easiest way to do this is to tape up the mount template, then use a level to line it up horizontally and vertically (the location of the studs will dictate where you can place your TV, so make sure you know that before you start drilling holes).

If you don’t have a level, you can also try using a pencil to mark the locations where the studs should go on the wall. Then, drill the pilot holes, which are just big enough for your mounting screws to fit through. You’ll need a carbide-tipped masonry bit for this and a standard Phillips-head drill bit for driving the mounting screws.

Next, you’ll need to hold the mount up to the wall and use a level to make sure that it is level. If it’s not, you may need to use a screwdriver to loosen the screws in the mount template and move it until it is. Be sure to tighten the screws firmly once everything is in place. You’ll also need a carpenter’s level for final checks before you’re finished. This will keep you from ending up with a crooked TV that’ll leave you wondering where the problem is.

Choosing a Mount

There are a lot of different TV wall mounts available. Narrow down the options by determining your own viewing needs and the room in which you intend to mount the TV. To start, decide whether you want your TV to have a fixed or moving position. Once you have done this, you can narrow down the choices by evaluating features like the ability to swivel or tilt the TV and wire management options.

Then, be sure the mount is rated for the weight of your TV. All major brands will list the suggested weight limits for their mounts. Sticking to these restrictions will prevent your mount from sagging under the weight of a heavy TV or, worse yet, failing mechanically and causing damage or injury.

Another consideration is the mounting location and height. Make sure the mount can withstand the weight of your TV and any other equipment you plan to install (like sound systems or video game consoles). You may also need to install an electrical outlet where the wall mount will be mounted. It is a good idea to consult an electrician before beginning any electrical work.

Once you have settled on the location, use a stud finder to determine if there are studs in the wall where you plan to mount your TV. If there aren’t studs, it will be difficult to secure your mount and could lead to structural damage.

Next, choose a mount with a VESA pattern that matches your TV. This will ensure that the mount can support your TV’s screen size and type. Look for this information in the TV’s manual or on its manufacturer’s website.

Finally, consider the type of movement you want your TV to have. You might need a flat mount for a fixed position or a swivel or tilting mount for a more adjustable position. Finally, evaluate the wire management options offered by each mount to determine which one will work best for you. There is nothing that will detract from the look of your new TV installation faster than loose wires hanging down from the mount. Look for mounts that offer channels or clips in the body of the unit to keep wires neat and tidy.

Preparing the Wall

If you want to mount your TV to a wall, it’s a good idea to start with some planning. This can help ensure that the project is successful and also minimize the possibility of crooked or uneven mounting, which can detract from your viewing pleasure.

First, decide where you want to mount the TV and select an appropriate location. Be sure that you choose a spot that allows for comfortable seating and consider the optimum viewing angle and height for your TV (see our guide on the Best Place to Mount a Television for more tips).

Next, determine what type of wall you have. Drywall is the most common wall material, and fortunately, most mounts are designed to work with it. However, to support the weight of the TV and the mount itself, it’s important that your wall have studs (vertical pieces of wood) behind it. These will provide a strong anchor point, and they’ll keep your mount from falling off the wall.

If your home is an older type of building, it may have solid brick walls or concrete breeze blocks. These require special care and extra fixings, so it’s best to consult an expert before attempting to mount a TV on them. Newer homes and some conversions are often constructed from timber frames or plasterboard. Using these types of walls can be tricky as they don’t have the same structural integrity as a stud wall.

Once you’ve determined the type of wall, it’s time to prepare it for the mounting process. Begin by removing any electrical outlets or junction boxes from the area where you plan to mount the TV, and use a stud finder to locate studs in the wall. Be sure to mark the stud locations with a pencil so that you know where to drill your pilot holes for the mounting screws later.

If you don’t have a stud finder, remove the cover from an outlet or junction box and poke around with your finger to feel for any hollow spots. You can also use a screwdriver to test the wall by driving a screw into it. If it holds the screw securely, then you have a solid surface for your TV mount.

Mounting the TV

A mounted TV brings a sense of style to the room and elevates the viewing experience for everyone watching. It can also increase the amount of usable space in a room and help avoid the annoyance of wires running across the floor.

Before you do anything, make sure to turn off any circuit breakers in the area where you plan to mount the TV. You’ll also want to have a partner to help with this project and ensure that all measurements are accurate. You’ll need a stud finder, a power drill, and tools like a tape measure, screwdriver, and level to complete this project successfully.

Begin by locating the wall studs where you want to mount the TV. A stud finder is the easiest way to do this. Once you’ve found the stud locations, mark them on the wall with a piece of tape.

Most TV wall mounts come with a mounting template to help you determine where the screw holes will go on the back of your TV. The mounting template may include multiple hole options to compensate for the location of the studs on your wall. If not, you can usually use a ruler to estimate the position of the mounting holes.

The next step is to attach the mounting bracket to the back of your TV. The bracket will have screw holes that line up with four of the holes on the back of your TV. It is important to be aware of how far apart the studs are in your wall when mounting a TV, so you can purchase a mount that fits the distance between each stud.

Hollow-wall drywall mount installations can be limited to total weights (TV, mount, and all accessories) of 100 pounds or less. For a safe installation, use toggle bolts instead of regular screws on these installations.

If you have a smart TV, the height of the wall mount may impact the quality of the WiFi signal. It’s worth experimenting with different positions to see what works best for your home. Also, consider any other obstacles that could get in the way of a clear signal, such as nearby chimneys or large furniture pieces.

Things to Look for When Choosing Roofing Contractors

Roofing

While building maintenance staff is usually aware of the roof and its needs, there is no substitute for the expertise of a professional Roofing Contractor. Many of them are busy with other tasks and may not have the time to climb onto the roof. Although obvious problems can be quickly diagnosed, other issues may not be so apparent. Colorado Springs Roofing Contractor are trained to spot problems in a timely manner. Here are some things to look for when choosing a Roofing Contractor.Roofing

Some jobs are more demanding than others, and specialists have a specific set of skills. Specialization allows workers to specialize in a particular area, and this type of job is often associated with higher pay and greater internal power. In many cases, specialization also makes it easier for people to learn a new job. Specialists also have more flexibility and autonomy in their roles, as they are usually more skilled than generalists.

Job specialization also boosts morale among employees. Employees who specialize in a certain part of the job tend to band together in a positive team mentality. Ultimately, this leads to improved performance and less stress on the job. For this reason, employers often invest time and resources into hiring and training employees with specialized skill sets. When employees feel like they have an advantage over their co-workers, it’s better for their morale.

They have workers’ compensation and liability insurance.

The two types of business insurance include liability and workers’ compensation. The former pays compensation to employees for work-related injuries, while the latter protects the employer from lawsuits for legal liability. Workers’ compensation policies also cover injuries or damages that occur outside of work. The cost of these insurance policies depends on a variety of factors, including the number of employees, payroll, industry, and history of claims. General liability insurance is generally more expensive than workers’ compensation insurance.

Workers’ compensation insurance pays benefits to injured employees, despite the fact that they waive their right to sue their employers. The benefits typically include hospitalization, physical therapy, rehab, and disability income. Unfortunately, workers’ compensation insurance does not cover injuries that occur to independent contractors. It is therefore important for employers to purchase liability and workers’ compensation insurance to protect their businesses from these unfortunate situations. However, businesses should also consider whether this insurance is necessary for their business.

They provide written estimates.

Roofing contractors should provide customers with a written estimate for their roofing project. This document helps the customer understand what the work will entail, how much the job will cost, and what their options are. A good estimate also avoids surprises and ensures that the customer understands the difference between the different options and how much they will cost. Furthermore, providing customers with an estimate will make them more likely to hire the Roofing Contractor. In short, a good estimate should be part of a roofing contractor’s service.

Roofing estimates should include details about the scope of the project, start and end dates, costs, and a guarantee. They should also include any additional fees, such as permits if any, and the cleanup process after the job is completed. A thorough estimate will include these details as well as the amount and date of the final payment. You can also expect the contractor to include a full description of the work that needs to be completed, as well as the materials used and any additional costs that may occur as the project progresses.

The written estimate should also contain insurance and license information, which are both important considerations before hiring a Roofing Contractor. A reputable company won’t hire a person based solely on an estimate, so always check their business license and review online reviews to ensure they have adequate insurance to cover any unexpected costs. Besides, you should also ask about the insurance coverage of the Roofing Contractor, as this is the only way to make sure they are adequately insured and have the required licenses and permits.

If your insurance company requires a written estimate, a good roofer should also provide you with an explanation of the different types of roofing materials and the differences between them. You should ask about any warranties offered by the Roofing Contractor, as they are your protection in the event of a major accident. The warranty should also state how long the roof will last and whether or not it can be transferred to another homeowner. If your insurance company issues a check prior to the completion of the work, a written estimate is necessary.

Find a Roofing Contractor near you.

A reliable roofing contractor will know how to get the necessary permits and paperwork. One thing to pay attention to is insurance. While accidents can happen without warning, no one wants to be held responsible for them. Check to make sure your contractor has liability insurance and worker’s compensation insurance, and ask to see their insurance documents. You’ll have a better idea of their reliability if they have all of these policies. This article will cover the important details you need to know about roofing contractors.

While the cost to enter the roofing industry is not high, there are a lot of people who don’t have the proper training and are deceptive. If you want to avoid being scammed, find a contractor who has completed a variety of projects for other people. Ask to see proof of their certifications and licensing to make sure they’re trustworthy. Once you’ve done this, you’ll know which contractor to use for your roofing project.

Check online reviews

When looking for a roofer to help with your next roof project, you can check out online reviews. The truth is that consumers are usually the most honest about their experiences with products and services. This makes it crucial to read these reviews before hiring a roofing contractor. However, you should remember to take online reviews with a grain of salt – sometimes, these reviews are exaggerated. Nonetheless, they will give you some idea about the quality of work you can expect from the company.

Usually, the roofing contractor will ask if customers can publish a single review on different platforms. Those review platforms will require customers to sign in and leave a review. While some businesses may try to replicate the same review across multiple platforms, this is not a smart strategy. A better strategy is to vary your review solicitation. You should also avoid roofing companies that offer financial incentives to provide positive reviews. Google has cracked down on unethical review generation, so beware.

Ask friends and neighbors.

Before choosing a roofing contractor, you should ask around for recommendations. Roofing material suppliers can also provide references. Check reviews and search for references on the Internet. Be sure to choose a reputable company and avoid the storm chaser variety. In addition, ask for references from past customers. A roofing contractor with a good reputation and a long track record is the best choice. However, this may not be the case with every roofing contractor.

It is best to seek recommendations from family, friends, and neighbors. While it may be intimidating to ask people you know, they can be a good resource. Visiting a neighbor’s roof or knocking on their door is a great way to learn about a contractor’s skills. Ask if they’ve had experience working with the contractor and, if so, who they hired. Manufacturer certification is a good indicator of a trustworthy, reputable, and reliable contractor.

Get three quotes

Getting three estimates from different roofing contractors is a great idea. Not only will you be able to compare prices, but you will also be ensuring you get the best value for your money. Get three estimates from different contractors so that you can choose the one who is right for you. However, you should remember that this process can be overwhelming and stressful. To avoid this, you should only get three quotes. Then, you can compare and contrast them to find the best one for your needs and budget.

After getting three estimates, it is a good idea to get references and check the previous work of each of the contractors. Make sure to check the references and review the company’s work history online. Also, you may want to contact your friends or family members for recommendations. If they have had good experiences with a particular company, it’s likely that they’ll recommend it. And, if you’re not sure, you can always call a previous client for a second opinion.

The Cost of an Auto Repaint

auto repair

auto repairRepainting your vehicle can be expensive, but it’s worth it. Not only does it make your vehicle look better, but it also protects the steel and metal from rust and corrosion. Before painting, the surface must be sanded smooth to give the new paint something to adhere to. This can be done manually or with a block sander.

The cost of auto repaint  can vary widely depending on the type and quality of paint used. It also depends on the vehicle’s size and the body shop’s location and expertise. For example, high-quality paints that last longer and require fewer coats can be expensive, but they are usually worth it in the long run because they will prevent future problems like rust or peeling.

Other factors that can affect the price of a car repaint include the condition of the vehicle prior to painting and any stylistic touches or paint protection options you may want to add. For example, if your car has deep scratches or dents that need to be repaired before the paint job can begin, this will take up time and labor, which will add to the total cost of the project. In some cases, auto painting services may even charge extra for vehicles with severe surface damage because it can cause problems later on if not properly addressed.

Paint color is another important factor in the overall price of a repaint, as different shades can drastically affect the cost. Standard paint colors such as black or white are typically the cheapest, while custom or specialty hues will be more expensive. For instance, an exotic purple or pink color would require a special order from the auto manufacturer and might cost several times as much as a basic black or white paint job.

When shopping for a painting service, look for shops that offer detailed quotes that break down all the steps and costs involved. Avoid shops that give you a low price because they might not do a good job and end up damaging your vehicle in the long run. For example, they may not mask off trim areas correctly, which could result in over-spraying onto windows or using cheap paint that won’t hold up to the weather.

Resale Value

In some cases, a repaint can increase resale value. It can improve the trade-in value of an older vehicle or increase the asking price if you intend to sell it directly. However, the cost of a repaint is not always recouped on resale, and it may be more expensive than other methods of improving a vehicle’s appearance.

It’s important to address any existing damage before beginning a repainting project. Extensive paint damage can have a negative impact on resale value, as potential buyers may associate it with poor maintenance and care. Repainting a car is a complex process that requires a lot of skill and experience to ensure a quality finish. It’s best to consult with a professional to avoid costly mistakes that can decrease resale value.

The color of a car can also have a significant impact on its resale value. Neutral colors such as white, silver, and black tend to retain their popularity over time and are more likely to be preferred by potential buyers. Color trends can vary by region, so it’s important to consider local preferences when selecting a paint color.

There are many different products on the market that can be used to repaint a car. Some are available in liquid form and require a compressor to apply, while others come in an aerosol can and are easy to use for touch-ups. Some even come with a primer to help the new coat of paint adhere. These products can be found at most automotive stores.

Some car enthusiasts and collectors place a high value on originality, especially when it comes to classic vehicles. Depending on the make and model of the vehicle, a professionally executed repaint that matches the original color may increase resale value.

If you’re looking for a product to repaint your trim, SEM’s Trim Black is the perfect choice. It’s designed to match the satin-black finish that most manufacturers put on their cars. It’s also easy to apply, and it can be purchased in one-quart cans for spray guns or in an aerosol can for simple touch-ups.

Safety

A vehicle paint job may not seem like a high-risk activity, but working with several chemicals at once can pose a health risk. Auto painting involves a combination of volatile organic compounds (VOCs), chromates, and isocyanates, which are toxic to the skin, mucous membranes, and respiratory tract. These substances can cause rashes, itching, asthma, and even death in extreme cases. It is important to read the Safety Data Sheet (SDS) for each chemical you are using and take the necessary precautions.

It is also essential to protect yourself from the harmful effects of overspray by wearing a respirator while spraying and using a face mask when applying paint. A respirator is a heavy-duty mask that uses different levels of filter cartridges to keep fumes out of your lungs and eyes. There are some great masks available at Eastwood that are affordable enough for the average DIY auto painter.

There are some newer automotive paints that are safer for the environment and the professionals working with them, but it is important to always check the VOC content of a product before using it on your vehicle. A good-quality paint will have lower VOCs and will not release dangerous vapors into the air during the drying process.

In the past, automobile painting involved a single-component paint that dried by solvent evaporation and took weeks to cure. Today, it is done much more quickly and efficiently with two-component catalyzed paints that can be sprayed and cured in heated booths. The pretreatment process is vital to the success of the finish. It removes impurities, reduces corrosion, and provides a uniform, smooth surface for the finish to adhere to.

Before the paint is applied, the car must be thoroughly cleaned and sanded to ensure a smooth finish. It is a good idea to remove any interior components, such as the dash or console, before bringing your vehicle in for repainting. This decreases the chance of losing valuable items and saves the body shop time.

Auto paint is not just for looks; it’s actually designed to prevent structural damage to the steel of the car over time. It also helps to protect the vehicle from rust and corrosion, which can be detrimental to its function and the driver’s safety.

Prevents Corrosion

Modern vehicles have much better rust resistance than their counterparts did just a few decades ago, thanks to a host of advanced materials science and engineering. Steel components are dipped in anti-corrosion coatings when they roll off the assembly line, and most newer cars have added aluminum or magnesium components to make them rust-proof. However, no matter what a car is made of, it will still rust if exposed to the elements over time. The best way to keep the corrosive effects of iron oxide at bay is with an excellent auto paint job.

A great automotive paint job is more than just a pretty color to look at. Modern auto paint jobs are a multi-step process, beginning with a coat of primer or sealant that protects the bare metal from rocks and other road debris. Next comes the base coat, which gives the vehicle its desired color. Finally, a clear coat is applied, which gives the finished product that glossy shine that consumers love so much.

Having the right quality of paint will give you a more durable finish that will hold up well against sand, salt, UV radiation, and other environmental factors. A good primer and base coat can last up to five years, depending on how they are cared for. A quality clear coat can last longer than that. The durability of a car’s paint can be greatly improved by using urethane paint, which is the most durable type of automotive paint available.

Rust is the enemy of every car owner, and once it starts spreading across the surface of your vehicle, it will never stop. It can weaken the structure of your vehicle and ruin its resale value, so it is vital to keep it at bay.

Purchasing a sealant that prevents corrosion can be a good option, and there are many different brands on the market to choose from. Choose one that is compatible with your specific vehicle and the conditions where you live. It should also dry quickly so that you can use your vehicle afterward.

Add a Touch of Art to Your Home with Custom Art Glass

Custom Art Glass

Add a touch of art to your home with custom glasswork. Our team at Your Home Exterior Solutions can collaborate with you to create a unique piece of art that will enhance your home.Custom Art Glass

Unlike some art glass makers who make multiple pieces of the same design, each of our pieces is hand-blown. This allows for a level of quality, skill, and precision that can only be gained through experience.

There are many ways to personalize a glass piece. Engraved text, patterns, and colors are some options. Another way to add personalization is to use a photo. This is a great option for a personalized gift or to commemorate a special occasion.

When it comes to decorating a space, art glass is one of the most versatile choices available. It’s a unique and elegant way to express your style and create an inviting atmosphere. Glass wall art is an effortless way to add a touch of elegance to any room. Choose from an assortment of frameless, free-floating glass wall pieces that feature stunning prints.

Custom glass awards can be a great way to recognize the achievements of your employees. They can be engraved with the recipient’s name and a message, making them truly special. When you hand these awards to your employees, they will know that you value their hard work and dedication. Art glass awards have a sculptural form, which makes them stand out from other types of plaques and awards. They also tend to be heavier, which makes them feel more substantial in the hands of recipients.

Decorative glass is an elegant choice for many gifts. Design a beautiful glass vase for the woman in your life with her monogram or a romantic sentiment. You can also create functional glassware for the home, like etched wine glasses and a personalized beer mug. Pair your glass gift with a complementary texture, such as a wood-grain desktop plaque or ceramic tile, to enhance its beauty. Creating glass gifts is a thoughtful gesture that’s sure to make anyone’s day. This type of gift is a sophisticated choice for formal occasions, such as an anniversary or graduation party.

Colors

Art glass is a wonderful way to add visual interest to your home. Its color palette is vast, allowing homeowners to create unique, personal spaces that reflect their personality and taste. Many designs feature varying shades, tints, and hues that complement the rest of the room’s design elements, whether they’re bright and cheerful or subtle and neutral.

While some homeowners may seek perfect products in their glassware, the artisan-crafted nature of art glass allows for natural variations in texture, color, and other visual effects. These differences are not flaws, but part of the beauty and charm of art glass that can only be found in handmade pieces.

Some color variations may occur in your glass, such as optic ridges and shear marks, which are caused by the difference between the density of the molten glass when it was blown and the material to which it was applied afterward. These variations can also be attributed to slight changes in temperature during the glassmaking process.

In addition to the standard glass colors offered with each design, SkLO can provide custom colors for certain windows. Please contact a sales representative for details.

Implementing customized art glass awards into your recognition program is a fantastic way to reinforce your organization’s unique message. Our selection of unique art glass awards includes many shapes, beautiful colors, and captivating designs that are sure to make your next award ceremony a success. These one-of-a-kind awards will be cherished and displayed with pride by your distinguished award recipients. They are ideal for recognizing years of service, sales achievements, retirement, and general achievement awards. You can even use them to distinguish employees for safety achievements or for achieving a milestone.

Texture

Art glass can be made into anything from small beads and jewelry to wall hangings, windows, and even larger installation pieces. It can be crafted using a variety of techniques, including etching, wheel carving, acid etching, frosting, enameling, and gilding. Glass artists can also combine these techniques to create a unique look for their work.

Glass art is generally created by hand, with the exception of kiln-formed glass, which is formed in a mold. Artists can make the mold themselves or work with a company to produce a design for their project. Glass artists may also use a variety of different metal oxides to color their work, such as gold or cobalt. These pigments are added to the raw materials before melting, which changes the hue when cooled.

Customized etched glass is becoming more popular for both residential and commercial projects. This is because of its fast production time, affordable price, and flexibility to be used in doors, shower closures, mirrors, tables, and room dividers. Etched glass offers a frosted or textured appearance and can be customized to meet specific design needs.

Palace of Glass specializes in creating windows, doors, and partitions with a variety of glass textures that enhance any space. They also offer a wide array of color options that can be mixed with any texture to create a personalized look for your project.

The beauty of art glass is that it brings a sense of elegance and sophistication to any space. Its unique style adds value to a home and can also increase its curb appeal. When properly installed by licensed installers, art glass can be used in entry doors, bathroom windows, room dividers, and even decorative windows. It can also be customized to include personal imagery, a special message, or a branded logo.

Patterns

Whether it’s a decorative sidelight for your front door or an intricate design in your shower, art glass can make a dramatic architectural statement. Glass can also be used to create privacy in a bathroom or add an element of color and design to a kitchen.

Custom stained glass brings a unique, personalized look to your home. You can choose from a wide variety of patterns to complement your interior design or even use your own photo, sketch, or idea as inspiration. Techniques that can be applied to glass include engraving (wheel carving or acid etching), frosting, enameling, and gilding. The shapes of the glass can vary, but some are designed to be shaped into walls or large panels.

Glass can incorporate Japanese rice paper for a softer texture; be mouth-blown for an authentic, vintage feel; or be rolled for a three-dimensional effect. Glass can be etched, carved, painted, sandblasted, or frosted, and the transparency of the glass allows light to pass through while offering varying degrees of privacy.

In the past, most glass was produced in factories where specialized furnaces could produce multiple pieces of a single style with little variation. However, a trend in the 1970s saw glassblowers relearning the art of glassmaking so that they could produce small decorative pieces such as paperweights and buttons. These handmade pieces are often referred to as “art glass.”

Size

Art glass can be custom-cut to fit the exact specifications of a project. It is often used to create decorative accents in homes, such as windows, doors, and other architectural features. It can also be incorporated into paneling, walls, and room dividers.

Stained glass is another popular form of glass art. It is a type of glass that has been colored by adding pigment to the molten material. This process allows artists to create a variety of shapes and colors that can be used in a wide range of applications. It is important to note that stained glass must be sealed and maintained regularly to prevent the formation of mold or other harmful substances.

Decorative glass is available in various styles, textures, and sizes. It is a great way to add uniqueness and style to a home, and it can also help hide unsightly items such as toilets or other storage spaces. Moreover, it can be used to protect existing stained glass from weather and vandalism.

Art glass is also a great choice for awards. It can be engraved with a personal message to make the award more meaningful. This way, it will become a treasured memento that the recipient can display in their office or home. Art glass awards are perfect for a number of events, including retirements, sales achievements, and general achievements.

When choosing custom-made art glass, it is important to choose a professional who can provide the highest-quality products at an affordable price. They should have a good reputation in the industry and be willing to work with customers to ensure their satisfaction. They should also have the necessary equipment to produce high-quality results. Besides, they should be knowledgeable about the different types of glass and the best way to install them in a home or business.

What to Expect From a Home Inspection

Home Inspection

Before hiring a home inspector, ask friends and family members for recommendations. Also, compare their prices and online reviews. Home Inspection Colorado Springs is a noninvasive visual examination of a house or condo’s physical structure and systems. It’s a critical step in home-buying that can save you money and hassle later.

Home InspectionHaving a home inspected is vital before putting it on the market, whether you are selling an existing property or building a new one. While some problems are cosmetic, others may indicate severe structural damage and need to be fixed in order for the house to be safe for inhabitants.

A home inspector will assess the structure of the building from the foundation up, including walls, ceilings, floors, and other features. They are looking for issues like uneven and bowing walls caused by movements in the foundation, which can be an indicator of severe structural damage. Uneven wall surfaces are often accompanied by cracks and gaps, which can also be signs of severe structural issues.

In some cases, the home inspector will recommend that a professional structural engineer examine the property. This is usually because the damage is extensive and requires a detailed load-bearing assessment, which a professional engineer can provide. If the structural inspection indicates that there are major problems, a professional engineer will typically suggest that a licensed contractor or home inspector conduct further assessments and repairs.

When preparing for a home inspection, homeowners should ensure that all utilities are turned on and that the attic and basement are clear of clutter. This will make it easier for the inspector to access the areas they need to inspect. They should also leave a clear path to the HVAC and furnace so that they can be tested. Providing the home inspector with a clean path will help them provide a more accurate report and will also help them save time and money on the inspection. This will make it possible to complete the inspection and make a sale on the property in a timely manner.

Home inspectors will test light switches and outlets, look at the electrical panel and visible wiring. They’ll be looking to see if there are enough outlets in each room, if the wiring is up to code and whether or not there are GFCI outlets, which help prevent electrical fires in rooms that might come into contact with water (kitchens, bathrooms and laundry rooms). If they see anything out of the ordinary, they’ll flag it. Older homes may have DIY electrical projects that aren’t up to code, and a home inspector will be able to identify these for future buyers.

GFCIs are required by law in any room where electricity might be in contact with water, and if they’re not working correctly it could lead to a dangerous power surge or even a fire. They’ll also look at the sink and bathtub faucets for leaks, check the vents in the ceiling to see if there are any stains or moisture damage, and inspect the pressure relief valve on the water heater for proper operation.

It’s a good idea to attend your inspection so that you can see the inspector at work and ask questions. This will make the whole process go a lot smoother, and you’ll have a better idea of how serious any issues are so that you can bring them up to the seller and ask for them to be fixed before closing.

Of course, a home inspector can’t catch every little problem, and most are not electricians, so they will likely flag any issue that they aren’t qualified to fix and defer to an electrician for further investigation. This is another reason why a pre-listing home inspection is becoming more popular, as it gives you an opportunity to fix any underlying problems before they become deal killers.

Home Inspectors are often called upon to examine plumbing in homes. This includes inspecting fixtures, supply lines and drains in the basement, bathrooms, kitchen, laundry room, water heater, sewage systems, and more. This part of the inspection is critical to ensure a functioning plumbing system and can help prevent future emergencies, such as a burst pipe or a clogged sink.

Most inspectors will also check for signs of water damage in the basement, including musty odors, mildew and mold growth, and damaged floors or walls. This can be caused by a variety of issues, from simple leaks to severe flooding. The home inspector will note these conditions and provide recommendations on how to correct the problem.

A plumbing inspection can be useful for anyone thinking of buying a property. A faulty plumbing system can be very costly, and it is worth investing in an inspection before making a final decision. This will give the buyer an idea of what the cost would be to repair the plumbing, and may even make them reconsider the purchase altogether if the repairs are too expensive.

A home inspection is a limited, noninvasive examination of the condition of a house, usually conducted in connection with the sale of that house. It does not guarantee the future condition, efficiency or safety of the house. It is important to remember that a home inspection should not be confused with a home appraisal, which determines the value of the property. A professional association of home inspectors, such as InterNACHI or the American Society of Home Inspectors, can provide a list of qualified home inspectors in your area. This will help you find an inspector who is competent and has good credentials.

Many homeowners don’t make it a habit of going into their attic, but that is one of the places that home inspectors go to during a home inspection. There are several things that an inspector will be looking for in the attic, including water damage, insulation, and even the structural integrity of the roof.

An inspector will look at the attic for signs of moisture, mold, and rot. Moisture can lead to wood rot and rust on metal fixtures. It can also cause mold and mildew which can be unhealthy for occupants. In addition, excessive moisture in the attic can cause damage to the rafters and ceiling below it, leading to expensive repairs.

Insulation in the attic is a big deal. It helps to lower energy bills because it keeps the house cool in the summer and warm in the winter. If there is not enough insulation in the attic, it will be noticeable on the house’s energy bills.

A home inspector will also check the attic framing and roof sheathing to see if it is sturdy. This will help determine if the framing is adequate to support the roof and protect the house from high winds.

An inspector will also examine the electrical system in the attic. This will include checking the main service panel, power outlets, branch circuit wiring and light fixture circuit wiring. The inspector will not open any panels or dismantle any devices, but he or she will observe their condition and operation. The inspector will also be looking for grounding, GFCIs and the compatibility of amperage and voltage ratings. In addition, he or she will be looking for the presence of aluminum branch circuit wiring.

Many home inspectors will find it a challenge to inspect crawl spaces, especially if they are un-insulated or covered by other storage. However, a well-equipped and experienced home inspector will make every reasonable attempt to gain access while communicating with the client. If a space is completely inaccessible then it should be saved for a later inspection and the client should be informed of this.

Regardless of whether a crawl space is insulated, it should be properly ventilated to control humidity. This helps to prevent wood rot, mold growth and fungus. It’s also a good idea to use a dehumidifier in the crawl space and to replace any insulation that has been damaged over time. This helps to reduce energy costs by preventing heat loss through the floor and ceiling.

Some of the most common issues found in crawl spaces include water damage, sagging floors, contaminated insulation, mold growth and rodent activity (which can lead to significant structural damage). Inspectors should be looking for signs of moisture on the soil/floor/vapor barrier, potential mold growth, rotting of joists/beams, efflorescence, and rust staining of furnace, water heaters or steel structural components.

A professional home inspector can identify these problems early and prevent costly repairs in the future. This is a major reason why real estate agents often require a home inspection prior to selling a property. A crawl space inspection can help homeowners understand how much repair work will be needed and allow them to negotiate a price that takes this into account. Also, if an inspector finds significant problems that will be expensive to repair, they can recommend the homeowner address these issues before closing on the property. This can save both parties a great deal of time and money.